
In this article, we will understand how to display content in the custom module link. Basically we will create URL for our module.
If you have not visited the how to create module in magento2, then do click here as very important information is shared. In this page, you learn about adding module link in footer and also enabling and disabling module from admin panel.
Are you ready for creating path and displaying information?? So lets Start…
There are 5 steps to get this done.
Step1:- Create route to our module
Step2:- Create controller and action
Step3:- The layout structure for the front-end
Step4:- Create Block for functions
Step5:- Create Template file for displaying content
Step1:- Create route to our module
In Magento2, url is represented by frontname/controller/action. So our aim is to create this url
http://<domain.com>/mymodule/index/index
in this post.
http://domain.com – represents your site url.
The front name as mymodule in the router file will be used to access the module through the URL. So Create routes.xml in app\code\Thecoachsmb\Mymodule\etc\frontend.
Content would be:-
<?xml version="1.0" ?>
<config xmlns:xsi="http://www.w3.org/2001/XMLSchema-instance" xsi:noNamespaceSchemaLocation="urn:magento:framework:App/etc/routes.xsd">
    <router id="standard">
        <route frontName="mymodule" id="mymodule">
            <module name="Thecoachsmb_Mymodule"/>
        </route>
    </router>
</config>
Lets understand, we are basically telling Magento that our module, Thecoachsmb_Mymodule, will be responsible for responding to routes under http://domain.com/mymodule .
Step2:- Create controller and action
To create controller class for each action, you have to create separate files for each. So Our URL becomes http://domain.com/mymodule/index/index. Now we will create Index.php file in app\code\Thecoachsmb\Mymodule\Controller\Index.
Content of file is :-
<?php

namespace Thecoachsmb\Mymodule\Controller\Index;

use \Magento\Framework\App\Action\HttpGetActionInterface;
use \Magento\Framework\View\Result\PageFactory;

class Index implements HttpGetActionInterface
{
    /**
     * @var \Magento\Framework\View\Result\PageFactory
     */
    protected $resultPageFactory;

    /**
     * @param PageFactory $resultPageFactory
     */
    public function __construct(PageFactory $resultPageFactory) {
        $this->resultPageFactory = $resultPageFactory;
    }

    /**
     * Prints the information
     * @return Page
     */
    public function execute()
    {
        return $this->resultPageFactory->create();
    }
}
If you mention http://domain.com/mymodule in the browser, http://domain.com/mymodule/index/index page will open. In Magento, if you haven’t mention name of controller or action, it interprets as Index automatically. So when you hit the url in the browser, Magento looks for Index Controller and Index Action in the Thecoachsmb_Mymodule.
- The
executemethod, when control comes in the contoller, this method automatically executed by magento. We don’t need to explicitly call it. In this method, we are simply telling Magento to render its layout by returning aMagento\Framework\View\Result\Pageobject. This will trigger the layout rendering process, which we will create in next step. - In Magento 2 all controller actions must return something, opposed to M1, where a controller action would just output something or did a redirect.
The result of theexecutemethod from each controller is generated inMagento\Framework\App\FrontController::dispatch()on line$result = $actionInstance->execute();and returned.Depending on the type of the returned result a different action is performed.
The result can be and instance of :\Magento\Framework\View\Result\Page– actually renders html\Magento\Framework\Controller\Result\Redirect– redirects to an other page\Magento\Framework\Controller\Result\Forward– forwards to an other action (internal redirect)\Magento\Framework\Controller\Result\Json– returns a json object.\Magento\Framework\Controller\Result\Raw– returns whatever you tell it to return (string).
Specific
resultPageFactoryis an instance of\Magento\Framework\View\Result\PageFactoryand when callingcreateon that class it returns an instance of\Magento\Framework\View\Result\Pagedescribed above.
When this is used and the result is returned it means that your action will return HTML.
It has somehow a similar effect as$this->loadLayout();from Magento 1.
When you callcreateon theresultPageFactoryobject it actually loads the layout
Now you should see a blank page at the url http://domain.com/mymodule. We still need to define the layout structure for that route, and its corresponding Block (our ViewModel) and the template file which will present the data to our user.
Step3:- The layout structure for the front-end
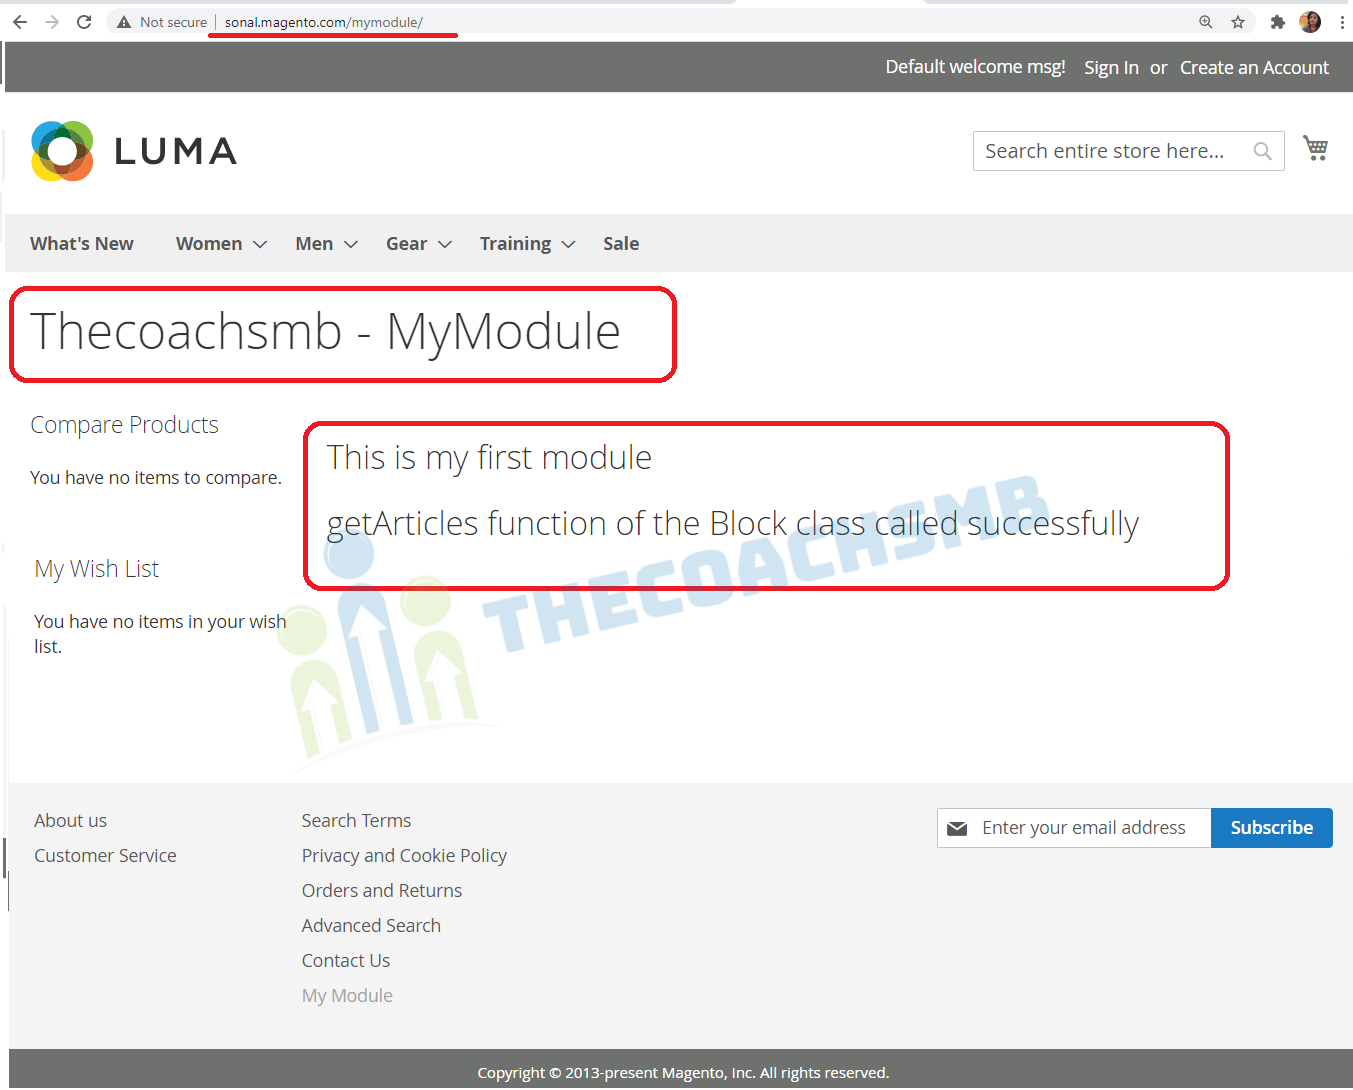
The layout structure for the front-end is defined under view/frontend/layout, and the file name must reflect our route. As our route is mymodule/index/index, the layout file for this route will be app/code/Thecoachsmb/Mymodule/view/frontend/layout/mymodule_index_index.xml
<?xml version="1.0"?>
<page xmlns:xsi="http://www.w3.org/2001/XMLSchema-instance" layout="2columns-left" xsi:noNamespaceSchemaLocation="urn:magento:framework:View/Layout/etc/page_configuration.xsd">
<head>
    <title>Thecoachsmb - MyModule</title>
</head>
<body>
    <referenceContainer name="content">
        <block class="Thecoachsmb\Mymodule\Block\Article"
            name="articleData"
                template="Thecoachsmb_Mymodule::view.phtml" />
    </referenceContainer>
</body>
</page>
This layout structure is basically telling Magento that, when a request is made to the mymodule/index/index route, a Block of the type Thecoachsmb\Mymodule\Block\Article is to be added to the content container, and the template which will be used to render it is Thecoachsmb_Mymodule::view.phtml. To create Block class, follow the next step.
Step4:- Create Block for functions
Its time to create Block file located at app/code/Thecoachsmb/Mymodule/Block/Article.php
and content would be –
<?php
namespace Thecoachsmb\Mymodule\Block;

use \Magento\Framework\View\Element\Template;

class Article extends Template
{
    /**
     * Constructor
     *
     * @param Context $context
     * @param array $data
    */
    public function __construct(
        \Magento\Backend\Block\Template\Context $context,
        array $data = []
    ){
        parent::__construct($context, $data);
     }

    /**
     * @return Post[]
    */
    public function getArticles()
    {
        return 'getArticles function of the Block class called successfully';
    }
}
?>
We have created getArticles() function and this function we are going to call in the view template file.
Step5:- Create Template file for displaying content
And to finish this route’s layout, here is our PHTML template, app/code/Thecoachsmb/Mymodule/view/frontend/templates/view.phtml:
content is here:-
<h2><?php echo 'This is my first module'; ?></h2>
<h2><?php echo $block->getArticles(); ?></h2>
Save the file and please run php bin/magento cache:clean to check result..
Lets hit the below URL-
http://<domain.com>/mymodule/index/index
and you will see the following output:-
Hope you liked the article.
Watch this on video for more clarification.
You can go through the third part of the series of custom module creation.
How to Create and Insert Data in Custom Database Table in Magento 2?
Do implement and let us know the feedback by commenting below. Hope you linked this article, Also please comment below giving your feedback. Your feedback is very important to us.
Happy Learning !!
Thank You !!
The tutorial was very helpful. I was able to follow all of the instructions given pretty easily. The extra explanations are especially helpful during the tutorial.
Great content as usual ?for clarity I want to point something up. the name of the layout is “routeId_controller_action.xml” in most instances the route id and the route frontName properties are the same (as in this tutorial) so people end up assuming that the layout file is named using the format “frontName_controller_action.xml” which is not correct. The front name and id of the route can be different and this comment will help people who wanna do that to name their layouts correctly. Thank you once again for the great tutorials keep up the good work
Thanks alex your comment saved my time. Thank you sonal for detailed tutorial.
Very helpful article. Works fine on Windows 10. Thank you!
Happy to hear that. Thank You for the feedback, Sergey Melkumyan !!
Thank you so much again for detail tutorial.
can you help me for where is learn folder definition and role of each folder in magento 2