
In this article, we are going to understand how to display data on the frontend from the database. This is the fourth part of the custom module series. If you are unaware about the earlier parts of this tutorial, the watch read and watch videos for more details on this. Here are the list of the custom module series:-
- PART 1 – How to Build a Complete Module
- PART 2 – Create Custom Module URL and Display Content
- PART 3 – How to Create and Insert Data in Custom Database Table in Magento 2?
Are you clear with first three links concepts. Hope you have created that module while reading.
We are going to continue building this module..so if you have not created yet then go and complete it quickly.
The following are the steps :
- Step 1 : Create Resource Model
- Step 2: Create Resource Model Collection
- Step 3 : Create API Data Interface
- Step 4: Create Model
- Step 5: Create Block File
- Step 6: Write the content in the phtml file
- Step 7: Bonus – To filter the records from the database
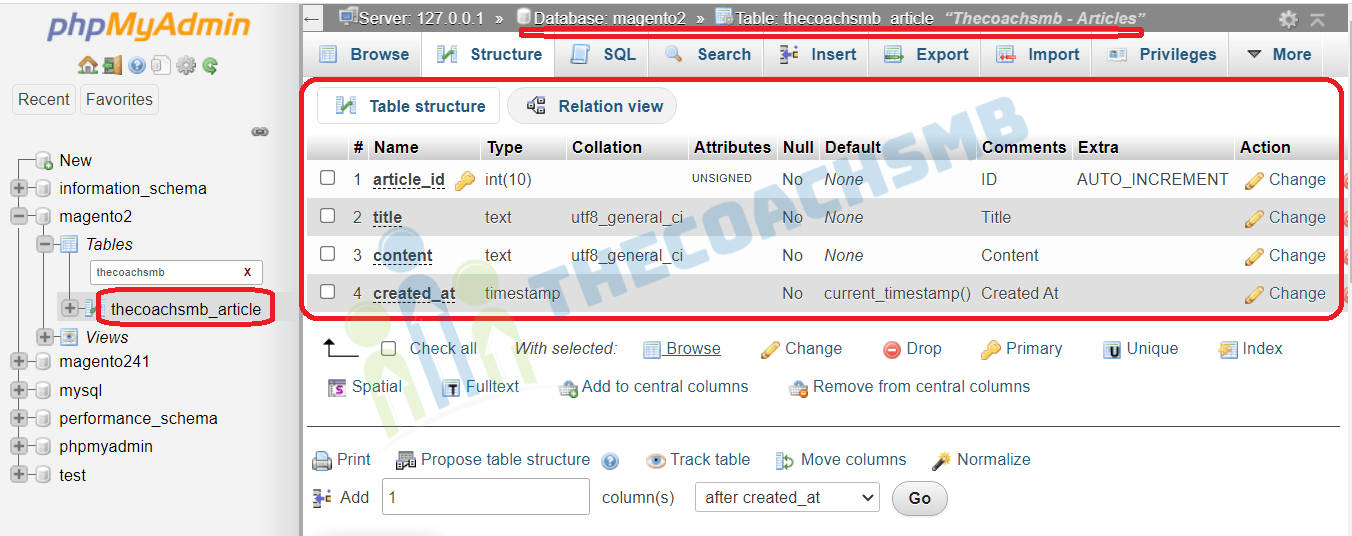
We have to create Model, Resource Model, Resource Model Collection to manage data in table: thecoachsmb_article
- Model
- ResourceModel
- ResourceModel Collection
The Model holds the business logic of the application, and depends on an associated class—the ResourceModel—for database access. Models rely on service contracts to expose their functionality to the other layers of the application.
-
Step 1 : Create Resource Model
The Resource Model is very simple, and simply states the table for which the Model will “connect” to, together with what its primary key is. We will create our ResourceModel at app/code/Thecoachsmb/Mymodule/Model/ResourceModel/View.php with the following contents:
<?php

namespace Thecoachsmb\Mymodule\Model\ResourceModel;

use \Magento\Framework\Model\ResourceModel\Db\AbstractDb;

class View extends AbstractDb
{
    /**
     * Post Abstract Resource Constructor
     * @return void
     */
    protected function _construct()
    {
        $this->_init('thecoachsmb_article', 'article_id');
    }
}
thecoahsmb_article – the table name in the Magento 2 database without prefix;
article_id – the name of the field in this table with the primary key and autoincrement.
All of the ResourceModel operations, unless you need something different from the usual CRUD operations, are handled by the AbstractDb parent class.
Every resource model in Magento must extends abstract class \Magento\Framework\Model\ResourceModel\Db\AbstractDb which contain the functions for fetching information from database.
-
Step 2: Create Resource Model Collection
The collection model is considered a resource model which allow us to filter and fetch a collection table data. We create the file app/code/ with the following content:Thecoachsmb/Mymodule/Model/ResourceModel/View/Collection.php
<?php
namespace Thecoachsmb\Mymodule\Model\ResourceModel\View;

use \Magento\Framework\Model\ResourceModel\Db\Collection\AbstractCollection;

class Collection extends AbstractCollection
{
    /**
     * Remittance File Collection Constructor
     * @return void
     */
    protected function _construct()
    {
        $this->_init(\Thecoachsmb\Mymodule\Model\View::class, \Thecoachsmb\Mymodule\Model\ResourceModel\View::class);
    }
}
Notice that in the constructor we simply mention the Model, which will represent the post entity throughout our code, and the ResourceModel, which will fetch the info at the database.
You must pass model and resources model class names to the _init method.
The Resource collection class must extends from \Magento\Framework\Model\ResourceModel\Db\Collection\AbstractCollection and call the _init() method to init the model, resource model in _construct() function.
-
Step 3 : Create API Data Interface
A Model is a class that represents an entity or a record from a database. The model also provides access to entity data that is used across the Magento 2 application.
In models, we will have many different functions such as manage data, install or upgrade module. The model should hold all the attributes we have defined in our schema, along with any business logic you might need. Following Magento 2’s pattern, we need to create a Data Interface that our model will extend from. We place the interface at app/code/Thechoachsmb/Mymodule/Api/Data/ViewInterface.php, and it should hold the table’s fields names, along with the methods for accessing them:

<?php
namespace Thecoachsmb\Mymodule\Api\Data;

interface ViewInterface
{
    /**#@+
     * Constants for keys of data array. Identical to the name of the getter in snake case
     */
    const ARTICLE_ID            = 'article_id';
    const TITLE                 = 'title';
    const CONTENT               = 'content';
    const CREATED_AT            = 'created_at';
    /**#@-*/


    /**
     * Get Title
     *
     * @return string|null
     */
    public function getTitle();

    /**
     * Get Content
     *
     * @return string|null
     */
    public function getContent();

    /**
     * Get Created At
     *
     * @return string|null
     */
    public function getCreatedAt();

    /**
     * Get ID
     *
     * @return int|null
     */
    public function getId();

    /**
     * Set Title
     *
     * @param string $title
     * @return $this
     */
    public function setTitle($title);

    /**
     * Set Content
     *
     * @param string $content
     * @return $this
     */
    public function setContent($content);

    /**
     * Set Crated At
     *
     * @param int $createdAt
     * @return $this
     */
    public function setCreatedAt($createdAt);

    /**
     * Set ID
     *
     * @param int $id
     * @return $this
     */
    public function setId($id);
}-
Step 4: Create Model
Now to the model’s implementation, at app/code/Thecoachsmb/Mymodule/Model/View.php. We will create the methods defined at the interface.
Let’s specify a cache tag through the CACHE_TAG constant and, at the constructor, we will specify the ResourceModel that will be responsible for the database access for our model.
<?php

namespace Thecoachsmb\Mymodule\Model;

use \Magento\Framework\Model\AbstractModel;
use \Magento\Framework\DataObject\IdentityInterface;
use \Thecoachsmb\Mymodule\Api\Data\ViewInterface;

/**
 * Class File
 * @package Thecoachsmb\Mymodule\Model
 * @SuppressWarnings(PHPMD.CouplingBetweenObjects)
 */
class View extends AbstractModel implements ViewInterface, IdentityInterface
{
    /**
     * Cache tag
     */
    const CACHE_TAG = 'thecoachsmb_mymodule_view';

    /**
     * Post Initialization
     * @return void
     */
    protected function _construct()
    {
        $this->_init('Thecoachsmb\Mymodule\Model\ResourceModel\View');
    }


    /**
     * Get Title
     *
     * @return string|null
     */
    public function getTitle()
    {
        return $this->getData(self::TITLE);
    }

    /**
     * Get Content
     *
     * @return string|null
     */
    public function getContent()
    {
        return $this->getData(self::CONTENT);
    }

    /**
     * Get Created At
     *
     * @return string|null
     */
    public function getCreatedAt()
    {
        return $this->getData(self::CREATED_AT);
    }

    /**
     * Get ID
     *
     * @return int|null
     */
    public function getId()
    {
        return $this->getData(self::ARTICLE_ID);
    }

    /**
     * Return identities
     * @return string[]
     */
    public function getIdentities()
    {
        return [self::CACHE_TAG . '_' . $this->getId()];
    }

    /**
     * Set Title
     *
     * @param string $title
     * @return $this
     */
    public function setTitle($title)
    {
        return $this->setData(self::TITLE, $title);
    }

    /**
     * Set Content
     *
     * @param string $content
     * @return $this
     */
    public function setContent($content)
    {
        return $this->setData(self::CONTENT, $content);
    }

    /**
     * Set Created At
     *
     * @param string $createdAt
     * @return $this
     */
    public function setCreatedAt($createdAt)
    {
        return $this->setData(self::CREATED_AT, $createdAt);
    }

    /**
     * Set ID
     *
     * @param int $id
     * @return $this
     */
    public function setId($id)
    {
        return $this->setData(self::ARTICLE_ID, $id);
    }
}
-
Step 5: Create Block File
It’s time to display the data on the frontend, for that write functions for fetching data from the collection.
Our Block, located at app/code/Thecoachsmb/Mymodule/Block/Article.php:
<?php

namespace Thecoachsmb\Mymodule\Block;

use \Magento\Framework\View\Element\Template;
use \Magento\Framework\View\Element\Template\Context;
use \Thecoachsmb\Mymodule\Model\ResourceModel\View\CollectionFactory as ViewCollectionFactory;

class Article extends Template
{
    /**
     * CollectionFactory
     * @var null|CollectionFactory
     */
    protected $_viewCollectionFactory = null;

    /**
     * Constructor
     *
     * @param Context $context
     * @param ViewCollectionFactory $viewCollectionFactory
     * @param array $data
     */
    public function __construct(
        Context $context,
        ViewCollectionFactory $viewCollectionFactory,
        array $data = []
    ) {
        $this->_viewCollectionFactory  = $viewCollectionFactory;
        parent::__construct($context, $data);
    }

    /**
     * @return Post[]
     */
    public function getCollection()
    {
        /** @var ViewCollection $viewCollection */
        $viewCollection = $this->_viewCollectionFactory ->create();
        $viewCollection->addFieldToSelect('*')->load();
        return $viewCollection->getItems();
    }

    /**
     * For a given post, returns its url
     * @param Post $post
     * @return string
     */
    public function getArticleUrl($viewId) {
         return $this->getUrl('blog/index/view/'.$viewId, ['_secure' => true]);
    }

}
If you remember, we have not defined a Thecoachsmb\Mymodule\Model\ResourceModel\View\CollectionFactory class. We only defined the Thecoachsmb\Mymodule\Model\ResourceModel\View\Collection. So how is this even working?
For every class you define in your module, Magento 2 will automatically create a Factory for you.
Factories have two methods:
create, which will return a new instance for each call, andget, which will always return the same instance whenever called—used to implement the Singleton pattern.
The third parameter of our Block, $data, is an optional array. As it is optional and does not have a type hint, it will not be injected by the automatic injection system. It is important to notice that optional constructor parameters must always be positioned last in the parameters. For instance, the constructor of the Magento\Framework\View\Element\Template, our parent class, has these parameters:
    public function __construct(
    Template\Context $context,
    array $data = []
  ) {
    ...
As we wanted to add our CollectionFactory to the constructor parameters after extending the Template class, we had to do it before the optional parameter, otherwise the injection would not work:
       public function __construct(
        Context $context,
        ViewCollectionFactory$viewCollectionFactory, array $data = [] ) { ...
At the getCollectionmethod, which will be accessed later by our template, we simply call the create method from the ViewCollectionFactory, which will return us a fresh ViewCollection and allow us to fetch our posts from the database and send it to our response.
-
Step 6: Write the content in the phtml file
Finally, let’s display the content on the phtml file located at
app\code\Thecoachsmb\Mymodule\view\frontend\templates\view.phtml<?php /** @var Thecoachsmb\Mymodule\Block\Article $block */ ?> <?php $articleCollection = $block->getCollection(); ?> <?php if (count($articleCollection)) { ?> <h2><?= $block->escapeHtml(__('Thecoachsmb Articles')) ?></h2> <?php foreach($articleCollectionas $post): ?> <h3><?= $block->escapeHtml(__('Article - ')) ?> <a href="<?php echo $block->getArticleUrl($post->getId());?>"><?php echo $post->getTitle(); ?></a> </h3> <h4><?php echo date('F j, Y', strtotime($post->getCreatedAt())); ?></h4> <p><?php echo $post->getContent(); ?></p> <?php endforeach; ?> <?php } ?>
In this View layer accessing our ModelView ($block->getCollection()) which in turn uses a ResourceModel (the collection) to fetch our models (Thecoachsmb\Mymodule\Model\View) from the database.
In every template, whenever you want to access its block’s methods, there will be a $block variable defined and waiting for your calls. This $block variable will hold the reference to the block class defined in the layout file.
Run the below command:
php bin/magento c:f
Here are the records present in the table ‘thecoachsmb_article’:

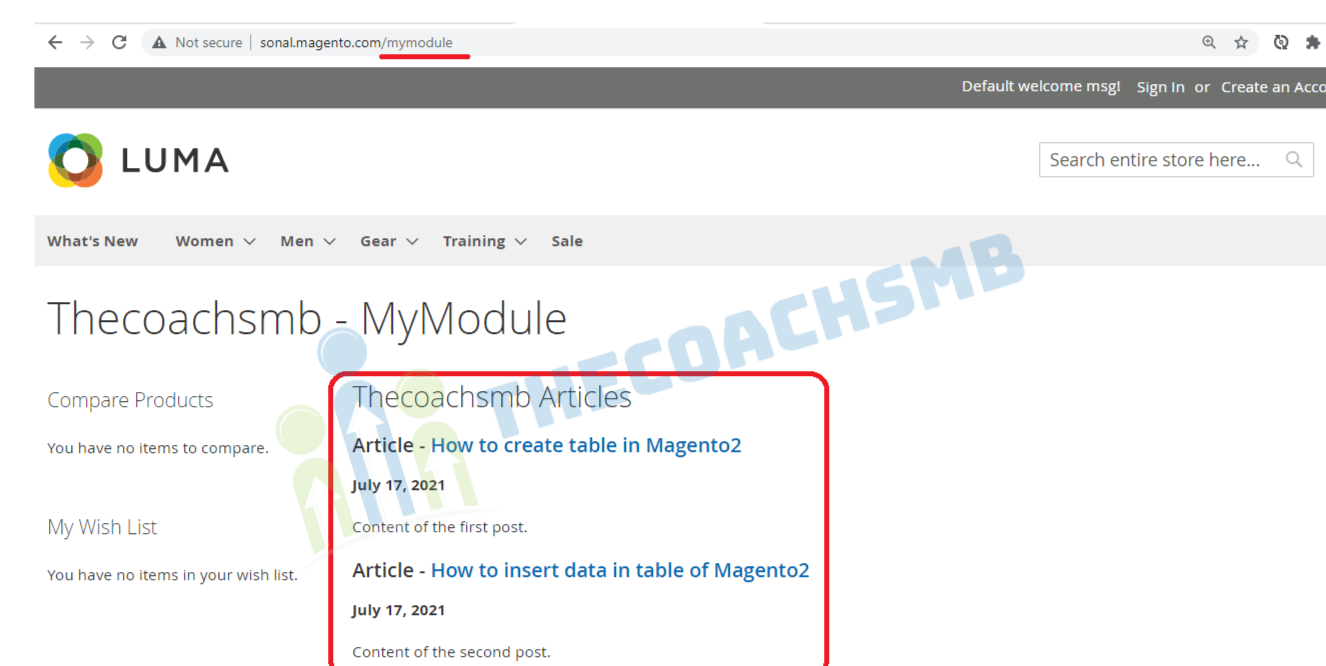
Wow, that’s great !!
Let’s learn something extra here…
-
Step 7: Bonus –
CRUD Operations:-
1. Fetch Record:
$blogModel = $this->viewFactory->create();
// Fetch One Record
$data= $blogModel->load(3)->getData();
print_r($data);
2. Delete Record:
// Delete Record
$blogModel = $this->viewFactory->create();
$blogModel->load(3)->delete();
3. Save Record:
// Saving the Data of form in Database
$job = Array ('title' => 'Test', 'status' => 1, 'is_active' => 1 );
$result = $blogModel->setData($job);
$result->save();
4. Update Record:
// Edit Third Data
$job = Array ('id' => 3, 'title' => 'sonal', 'status' => 1, 'is_active' => 0 );
$result = $blogModel->setData($job);
$result->save();
To filter the records from the database
addFieldToFilter($field, $condition) – adds “WHERE $ field = $ condition” constraint;
addFieldToSelect($field) – defines which columns to include in the query. By default, all columns are included in the query; * indicates all columns
setOrder($field, $direction) – indicates “ORDER BY $ field $ direction” sorting;
setPageSize($size) – indicates the “LIMIT $ size” restriction;
setCurPage($page) – sets the page number;
Exmaple:-
In the Block File, function as below:
public function getCollection()
{
/** @var ViewCollection $viewCollection */
$viewCollection = $this->_viewCollectionFactory->create();
$viewCollection->addFieldToSelect('*')->load();
return $viewCollection->getItems();
}
Example of working with a collection:
Let’s say you want to receives the first 10 entries, in which the status column equals 1 and created_at is greate than or equal to 2018-11-01. Status column is not there in our table. I am explaining this type of conditions we can apply as per the records and columns we have.
$collection = $this->_viewCollectionFactory->create();

$collection->addFieldToFilter('status', 1)
->addFieldToFilter('created_at', ['gteq' => '2018-11-01'])
->setPageSize(10);

foreach ($collection as $item) {
echo $item->getTitle();
}
This code executes queries to the database and receives the first 10 entries, in which the status column equals 1 and created_at is less than or equal to 2021-12-20. Then, this code displays the value of the ‘title’ column for each received entry in a loop.
We can see the data from the database on the front-end in our custom module. This is easy, just follow this tutorial.
Watch the complete video for visual presentation.
If you have any comment, drop below.
Happy Learning !!
Thank You !!
 Let’s Connect on LinkedIn!
  Expert insights on business growth
Very nice article,
How can i fetch data from custom table in my custom carrier module to fetch the shipping price. Is it the same way as mentioned above.
yes
Hello, if I click in the link article what’s happen
You provide more details about the article.
I am facing some issue in Article.php file .
Undefined variable: view
Cross check the code present in function getArticleUrl($viewId)
Resolved… Thanks for your reply mam..
Your tutorial is very helpful.
Perfect. Thank you so much Tanupriya Srivastava !!