Skip to content
TheCoachSMB
  • Follow Us:
Email: info@gmail.com
Call: +123-456-7890
TheCoachSMB

We Make It Happen

  • Blog
    • Magento2
    • HTML5
    • PHP Tutorial
  • Our Courses
  • Services
    • Magento 2 Installation Service
    • Magento Development Services
    • Support & Maintenance Services
    • Migration Services
    • Magento 2 Upgrade Service
    • Magento Security Patches
    • Magento Site Audit
    • Magento Speed & Performance
    • Magento Extension Development
    • Magento Consulting Services
    • SEO Services
    • Designing Services
  • Book A Call
  • Profile
  • About Us

    Lorem Ipsum is simply dummy text of the printing and typesetting industry.

    Contact Us
    Contact Info

    684 West College St. Sun City, United States America, 064781.

    (+55) 654 - 545 - 1235

    info@gmail.com

  • Get In Touch
  • Follow Us:
Email: info@gmail.com
Call: +123-456-7890
TheCoachSMB

We Make It Happen

  • Get In Touch
  • Blog
    • Magento2
    • HTML5
    • PHP Tutorial
  • Our Courses
  • Services
    • Magento 2 Installation Service
    • Magento Development Services
    • Support & Maintenance Services
    • Migration Services
    • Magento 2 Upgrade Service
    • Magento Security Patches
    • Magento Site Audit
    • Magento Speed & Performance
    • Magento Extension Development
    • Magento Consulting Services
    • SEO Services
    • Designing Services
  • Book A Call
  • Profile

How to add a new input form to checkout in Magento 2

  • Home
  • How to add a new input form to checkout in Magento 2
  • Sonal Motghare-Balpande Sonal Motghare-Balpande
  • May, Sun, 2022
  • Magento 2
How to add a new input form to checkout in Magento 2

Table of Contents

  • 3 Steps to add a new input form to checkout page
  • Step 1: Create the form UI component.
  • Step 2: Create template of the form.
  • Step 3: Register the form in the checkout page layout.
  • Conclusion

In the Magento2, checkout process is the most crucial part of the site. In this site owner expets that to know more about the customization of the shipping or payment information.

Magento provides the ability to add a custom form to any of the checkout steps: Shipping Information, Review and Payment Information, or custom.

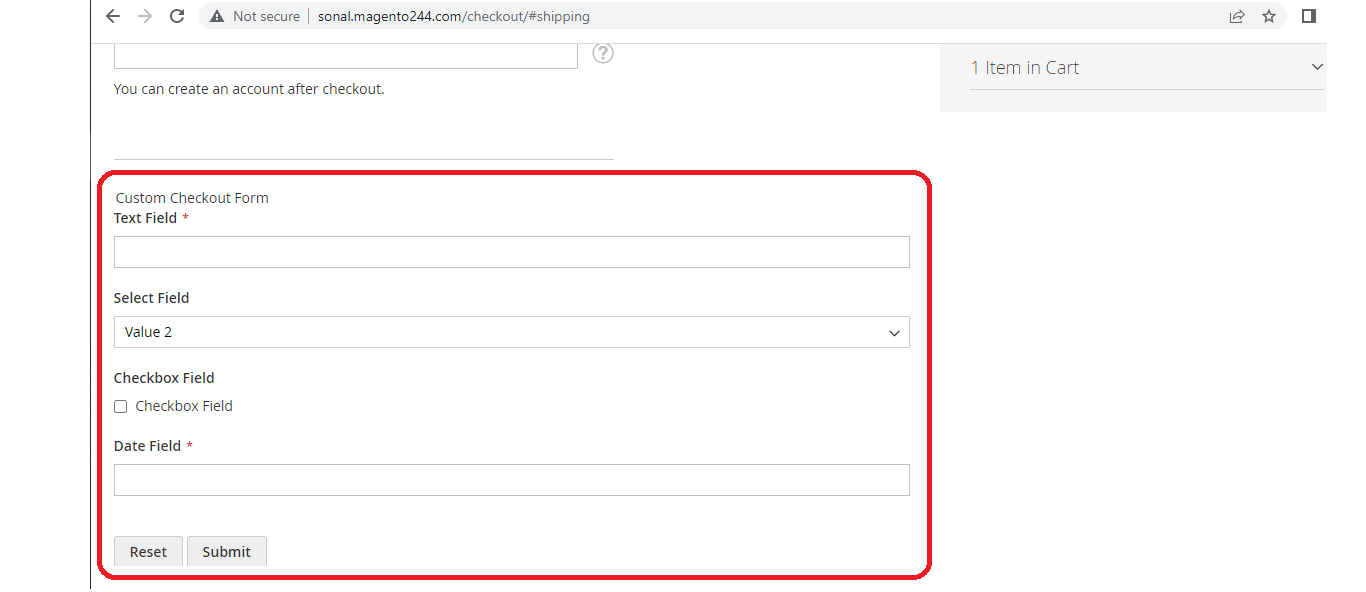
In this article, we will demonstrate how to add the new form before the Shipping Address form.

In this custom form, we are going to add 4 different types of fields:-

    • Text field
    • Dropdown field
    • Date field
    • Checkbox

with the validation.

There are only 3 steps for this. Let’s understand those one by one:-

3 Steps to add a new input form to checkout page

    • Step 1: Create the form UI component.
    • Step 2: Create template of the form.
    • Step 3: Register the form in the checkout page layout.

You should know how to create a basic Magento 2 module. All of customized files will be inside this module.

Let’s begin.

Step 1: Create the form UI component.

First of all, create custom-checkout-form.js in Thecoachsmb/ShippingForm/view/frontend/web/js/view directory.

/*global define*/
define([
    'Magento_Ui/js/form/form'
], function(Component) {
    'use strict';
    return Component.extend({
        initialize: function () {
            this._super();
            // component initialization logic
            return this;
        },

        /**
         * Form submit handler
         *
         * This method can have any name.
         */
        onSubmit: function() {
            // trigger form validation
            this.source.set('params.invalid', false);
            this.source.trigger('customCheckoutForm.data.validate');

            // verify that form data is valid
            if (!this.source.get('params.invalid')) {
                // data is retrieved from data provider by value of the customScope property
                var formData = this.source.get('customCheckoutForm');
                // do something with form data
                console.dir(formData);
            }
        }
    });
});

Step 2: Create template of the form.

Add the knockout.js HTML template custom-checkout-form.html for the form component under the Thecoachsmb/ShippingForm/view/frontend/web/template directory.

<div>
    <form id="custom-checkout-form" class="form" data-bind="attr: {'data-hasrequired': $t('* Required Fields')}">
        <fieldset class="fieldset">
            <legend data-bind="i18n: 'Custom Checkout Form'"></legend>
            <!-- ko foreach: getRegion('custom-checkout-form-fields') -->
            <!-- ko template: getTemplate() --><!-- /ko -->
            <!--/ko-->
        </fieldset>
        <button type="reset">
            <span data-bind="i18n: 'Reset'"></span>
        </button>
        <button type="button" data-bind="click: onSubmit" class="action">
            <span data-bind="i18n: 'Submit'"></span>
        </button>
    </form>
</div>

Step 3: Register the form in the checkout page layout.

We will add the new form before the shipping form.
Comparing to our last “Newsletter” component, this form is quite the similar

Except for the fact that the template and the whole form is in the xml itself (children node).
The reason we don’t write a normal html form is because of the way it (the form) declared. Normal html form cannot know how to communicate with the form component (the js file).

Create checkout_index_index.xml in the Thecoachsmb/ShippingForm/view/frontend/layout directory.

<page xmlns:xsi="http://www.w3.org/2001/XMLSchema-instance" layout="1column" xsi:noNamespaceSchemaLocation="urn:magento:framework:View/Layout/etc/page_configuration.xsd">
    <body>
        <referenceBlock name="checkout.root">
                <arguments>
                    <argument name="jsLayout" xsi:type="array">
                        <item name="components" xsi:type="array">
                            <item name="checkout" xsi:type="array">
                                <item name="children" xsi:type="array">
                                    <item name="steps" xsi:type="array">
                                        <item name="children" xsi:type="array">
                                            <item name="shipping-step" xsi:type="array">
                                                <item name="children" xsi:type="array">
                                                    <item name="shippingAddress" xsi:type="array">
                                                        <item name="children" xsi:type="array">
                                                            <item name="before-form" xsi:type="array">
                                                                <item name="children" xsi:type="array">
                                                                    <!-- newsletter component -->
                                                                    <item name="newsletter" xsi:type="array">
                                                                        <item name="component" xsi:type="string">Thecoachsmb_ShippingForm/js/view/newsletter</item>
                                                                        <item name="config" xsi:type="array">
                                                                            <item name="componentDisabled" xsi:type="boolean">true</item>
                                                                        </item>
                                                                    </item>
                                                                    <!-- new form -->
                                                                    <item name="custom-checkout-form-container" xsi:type="array">
                                                                        <!--links to our js file in step 1-->
                                                                        <item name="component" xsi:type="string">Thecoachsmb_ShippingForm/js/view/custom-checkout-form</item>
                                                                        <item name="provider" xsi:type="string">checkoutProvider</item>
                                                                        <item name="config" xsi:type="array">
                                                                            <!--links to our html file in step 2-->
                                                                            <item name="template" xsi:type="string">Thecoachsmb_ShippingForm/custom-checkout-form</item>
                                                                        </item>
                                                                        <!-- new element -->
                                                                        <item name="children" xsi:type="array">
                                                                            <item name="custom-checkout-form-fieldset" xsi:type="array">
                                                                                <!-- uiComponent is used as a wrapper for form fields (its template will render all children as a list) -->
                                                                                <item name="component" xsi:type="string">uiComponent</item>
                                                                                <!-- the following display area is used in template (see below) -->
                                                                                <item name="displayArea" xsi:type="string">custom-checkout-form-fields</item>
                                                                                <item name="children" xsi:type="array">
                                                                                    <item name="text_field" xsi:type="array">
                                                                                        <item name="component" xsi:type="string">Magento_Ui/js/form/element/abstract</item>
                                                                                        <item name="config" xsi:type="array">
                                                                                            <!-- customScope is used to group elements within a single form (e.g. they can be validated separately) -->
                                                                                            <item name="customScope" xsi:type="string">customCheckoutForm</item>
                                                                                            <item name="template" xsi:type="string">ui/form/field</item>
                                                                                            <item name="elementTmpl" xsi:type="string">ui/form/element/input</item>
                                                                                        </item>
                                                                                        <item name="provider" xsi:type="string">checkoutProvider</item>
                                                                                        <item name="dataScope" xsi:type="string">customCheckoutForm.text_field</item>
                                                                                        <item name="label" xsi:type="string">Text Field</item>
                                                                                        <item name="sortOrder" xsi:type="string">1</item>
                                                                                        <item name="validation" xsi:type="array">
                                                                                            <item name="required-entry" xsi:type="string">true</item>
                                                                                        </item>
                                                                                    </item>
                                                                                    <item name="checkbox_field" xsi:type="array">
                                                                                        <item name="component" xsi:type="string">Magento_Ui/js/form/element/boolean</item>
                                                                                        <item name="config" xsi:type="array">
                                                                                            <!--customScope is used to group elements within a single form (e.g. they can be validated separately)-->
                                                                                            <item name="customScope" xsi:type="string">customCheckoutForm</item>
                                                                                            <item name="template" xsi:type="string">ui/form/field</item>
                                                                                            <item name="elementTmpl" xsi:type="string">ui/form/element/checkbox</item>
                                                                                        </item>
                                                                                        <item name="provider" xsi:type="string">checkoutProvider</item>
                                                                                        <item name="dataScope" xsi:type="string">customCheckoutForm.checkbox_field</item>
                                                                                        <item name="label" xsi:type="string">Checkbox Field</item>
                                                                                        <item name="sortOrder" xsi:type="string">3</item>
                                                                                    </item>
                                                                                    <item name="select_field" xsi:type="array">
                                                                                        <item name="component" xsi:type="string">Magento_Ui/js/form/element/select</item>
                                                                                        <item name="config" xsi:type="array">
                                                                                            <!--customScope is used to group elements within a single form (e.g. they can be validated separately)-->
                                                                                            <item name="customScope" xsi:type="string">customCheckoutForm</item>
                                                                                            <item name="template" xsi:type="string">ui/form/field</item>
                                                                                            <item name="elementTmpl" xsi:type="string">ui/form/element/select</item>
                                                                                        </item>
                                                                                        <item name="options" xsi:type="array">
                                                                                            <item name="0" xsi:type="array">
                                                                                                <item name="label" xsi:type="string">Please select value</item>
                                                                                                <item name="value" xsi:type="string"></item>
                                                                                            </item>
                                                                                            <item name="1" xsi:type="array">
                                                                                                <item name="label" xsi:type="string">Value 1</item>
                                                                                                <item name="value" xsi:type="string">value_1</item>
                                                                                            </item>
                                                                                            <item name="2" xsi:type="array">
                                                                                                <item name="label" xsi:type="string">Value 2</item>
                                                                                                <item name="value" xsi:type="string">value_2</item>
                                                                                            </item>
                                                                                        </item>
                                                                                        <!-- value element allows to specify default value of the form field -->
                                                                                        <item name="value" xsi:type="string">value_2</item>
                                                                                        <item name="provider" xsi:type="string">checkoutProvider</item>
                                                                                        <item name="dataScope" xsi:type="string">customCheckoutForm.select_field</item>
                                                                                        <item name="label" xsi:type="string">Select Field</item>
                                                                                        <item name="sortOrder" xsi:type="string">2</item>
                                                                                    </item>
                                                                                    <item name="date_field" xsi:type="array">
                                                                                        <item name="component" xsi:type="string">Magento_Ui/js/form/element/date</item>
                                                                                        <item name="config" xsi:type="array">
                                                                                            <!--customScope is used to group elements within a single form (e.g. they can be validated separately)-->
                                                                                            <item name="customScope" xsi:type="string">customCheckoutForm</item>
                                                                                            <item name="template" xsi:type="string">ui/form/field</item>
                                                                                            <item name="elementTmpl" xsi:type="string">ui/form/element/date</item>
                                                                                        </item>
                                                                                        <item name="provider" xsi:type="string">checkoutProvider</item>
                                                                                        <item name="dataScope" xsi:type="string">customCheckoutForm.date_field</item>
                                                                                        <item name="label" xsi:type="string">Date Field</item>
                                                                                        <item name="validation" xsi:type="array">
                                                                                            <item name="required-entry" xsi:type="string">true</item>
                                                                                        </item>
                                                                                    </item>
                                                                                </item>
                                                                            </item>
                                                                        </item>
                                                                    </item>
                                                                </item>
                                                            </item>
                                                        </item>
                                                    </item>
                                                </item>
                                            </item>
                                        </item>
                                    </item>
                                </item>
                            </item>
                        </item>
                    </argument>
                </arguments>
        </referenceBlock>
    </body>
</page>

Now time to flush cache and test your result. If you have any issue, feel free to leave a comment below.

Conclusion

In this article, we learned about adding custom form with different types of fields. Only with three steps, we could do this in Magento2. do follow each and every step for the exact result.

Please feel free to share your feedback


Related Posts:

  • HTML5
  • Magento 2 Useful Commands List 2022
  • A Complete Guide on Magento 2 Form Validation
  • Events and Observers in Magento2
  • How to create Admin Module in Magento2
  • Magento 2 Create Shipping Method
Comments (22)
Sonal Motghare-Balpande

Hello Readers, My passion is to guide people by sharing the knowledge I have. If I can contribute even little to the people life, its very big achievement for me. Thank You, Sonal

One thought on “How to add a new input form to checkout in Magento 2”

  1. wan min says:
    December 28, 2022 at 2:31 PM

    I really love your every post about magento2 !

    Reply
    1. Sonal Motghare-Balpande says:
      December 31, 2022 at 11:07 PM

      Thanks wan min.

      Reply
  2. Christa Vosburg says:
    May 19, 2022 at 9:33 AM

    Keep this going please, great job!

    Reply
  3. Jeremiah Davitt says:
    May 10, 2022 at 3:48 PM

    Good day! This is my first comment here so I just wanted to give a quick shout out and say I truly enjoy reading your articles. Can you suggest any other blogs/websites/forums that cover the same topics? Thanks a ton!

    Reply
  4. Ambrose O'Bryan says:
    May 10, 2022 at 3:45 PM

    Hurrah, that’s what I was looking for, what a stuff! existing here at this weblog, thanks admin of this site.

    Reply
  5. Garland Moreira says:
    May 10, 2022 at 3:40 PM

    This is a topic that’s near to my heart… Thank you! Where are your contact details though?

    Reply
  6. Randall Ashbolt says:
    May 10, 2022 at 2:26 PM

    I was more than happy to find this site. I wanted to thank you for your time for this particularly wonderful read!! I definitely liked every little bit of it and i also have you saved to fav to see new things in your website.

    Reply
  7. Lizette Herrell says:
    May 10, 2022 at 1:37 PM

    We’re a group of volunteers and opening a new scheme in our community. Your website offered us with valuable information to work on. You’ve done a formidable job and our entire community will be grateful to you.

    Reply
  8. Vivien Florance says:
    May 10, 2022 at 1:21 PM

    Thank you for sharing your info. I truly appreciate your efforts and I will be waiting for your next write ups thanks once again.

    Reply
  9. Thomas Dellit says:
    May 10, 2022 at 1:11 PM

    Hello! I could have sworn I’ve been to this blog before but after checking through some of the post I realized it’s new to me. Anyhow, I’m definitely delighted I found it and I’ll be bookmarking and checking back often!

    Reply
  10. Williemae Ruyle says:
    May 10, 2022 at 12:38 PM

    Wow that was odd. I just wrote an very long comment but after I clicked submit my comment didn’t appear. Grrrr… well I’m not writing all that over again. Anyway, just wanted to say superb blog!

    Reply
  11. Moises Elisha says:
    May 10, 2022 at 12:26 PM

    This is really interesting, You’re a very skilled blogger. I have joined your feed and look forward to seeking more of your excellent post. Also, I’ve shared your site in my social networks!

    Reply
  12. Sanford Haverfield says:
    May 10, 2022 at 12:22 PM

    Great post! We will be linking to this particularly great content on our website. Keep up the great writing.

    Reply
  13. Archer Starnes says:
    May 10, 2022 at 12:16 PM

    Oh my goodness! Incredible article dude! Thank you, However I am going through problems with your RSS. I don’t know why I am unable to subscribe to it. Is there anyone else having the same RSS problems? Anyone that knows the answer will you kindly respond? Thanks!!

    Reply
  14. Ines Adcock says:
    May 10, 2022 at 11:51 AM

    Nice post. I was checking constantly this blog and I am impressed! Extremely useful information particularly the last part 🙂 I care for such info much. I was looking for this certain information for a very long time. Thank you and good luck.

    Reply
  15. Chase Headlam says:
    May 10, 2022 at 11:19 AM

    What’s up, all is going fine here and ofcourse every one is sharing information, that’s genuinely excellent, keep up writing.

    Reply
  16. Tabatha Vosper says:
    May 10, 2022 at 9:50 AM

    Great website. A lot of useful info here. I am sending it to a few buddies ans additionally sharing in delicious. And of course, thanks on your sweat!

    Reply
  17. Luigi Rochon says:
    May 10, 2022 at 9:39 AM

    Good post. I learn something new and challenging on blogs I stumbleupon everyday. It’s always exciting to read content from other authors and use a little something from other websites.

    Reply
  18. Samuel Tarpley says:
    May 10, 2022 at 8:44 AM

    Your style is so unique compared to other folks I have read stuff from. Many thanks for posting when you’ve got the opportunity, Guess I’ll just book mark this blog.

    Reply
  19. Pete Caro says:
    May 10, 2022 at 8:15 AM

    Wonderful, what a weblog it is! This website gives valuable facts to us, keep it up.

    Reply
  20. Mora Deegan says:
    May 10, 2022 at 7:53 AM

    Very nice article, just what I was looking for.

    Reply
  21. Robert Blackston says:
    May 10, 2022 at 7:51 AM

    When someone writes an paragraph he/she maintains the idea of a user in his/her brain that how a user can know it. Therefore that’s why this post is great. Thanks!

    Reply

Leave a Reply to Sanford Haverfield Cancel reply

Your email address will not be published. Required fields are marked *

Search
Recent Posts

  • Install/debug Magento2 delivery date extensionNovember 18, 2024
  • Install Magento 2.4.6 on Ubuntu 22.04 [Complete Guide]October 16, 2024
  • Install Magento 2.4.7 on Ubuntu 22.04 [Complete Guide]October 16, 2024
Categories

  • Accounting
  • Agency
  • Business
  • Consultant
  • Finance
  • Investment
  • Magento 2
  • Masonry
Calendar
May 2025
M T W T F S S
 1234
567891011
12131415161718
19202122232425
262728293031  
« Nov    
Tags

6 Steps to Install Magento 2 on XAMPP Windows Using Composer Agency Business composer install magento 2 download xampp for windows Graphics how to install magento how to install magento2 in localhost how to install magento2 in localhost ubuntu how to install magento2 in localhost wamp how to install magento 2 in windows 10 How To Install Magento2 in Windows on localhost using Xampp how to install magento 2 on xampp How to install Magento 2 using Composer in windows How to install Magento 2.4 in localhost XAMPP how to install magento 2.4 on xampp install magento 2 in windows10 install magento 2 using composer install magento 2 using composer windows install magento 2 windows xampp install Magento 2 with Sample Data install magento2.4 Install Magento 2.4 xampp windows 10 install magento 2.4.3 install magento2.4.3 install xampp on windows 10 Latest magento2 magento 2 composer install magento 2 install magento2 install magento 2 installation magento 2 installation steps magento 2 installation using composer magento 2 system requirement magento2.4 magento2.4.3 magento download magento for windows magento installation on xampp Magento with windows magneto2 Multisite thecoachsmb xampp download

LATEST BUSINESS IDEAS

Subscribe to Our Newsletter
& Stay Update

Lorem ipsum is placeholder text commonly used in the graphic, print, and publishing industries for previewing layouts and visual mockups.

Thank you to visit our site and doing business with us.

We give our 100% to help you and to grow together.

About Us

Ready To Start Work With Us?

Felis consequat magnis est fames sagittis ultrices placerat sodales porttitor quisque.

Get a Quote
Contact Us
  • Courses
  • Blog
  • Magento2 Tutorial
  • Shop
Quick Links
  • Appointment
  • Price Plans
  • Investment Strategy
  • Financial Advices
  • Strategy Growth
  • Services
  • Business Planning
Links
  • Privacy Policy
  • Terms and Conditions
  • My Account
  • Contact Us
  • About Us
Latest Posts
  • Install/debug Magento2 delivery date extensionNovember 18, 2024
  • Install Magento 2.4.6 on Ubuntu 22.04 [Complete Guide]October 16, 2024
  • Install Magento 2.4.7 on Ubuntu 22.04 [Complete Guide]October 16, 2024
Open Hours

Our support available to help you.

  • Monday-Friday: 10am to 10pm
  • Email: support@thecoachsmb.com
  • Call: +91 7020500374
Opening Hours
Week Days 10:00 - 17:00
Saturday 10:00 - 15:00
Sunday Day Off
Contact us
Copyright © 2025 TheCoachSMB
🚀 Let’s Connect on LinkedIn! 🚀

Want to level up your skills and knowledge? 🚀
Follow us on LinkedIn to get:
✅ Expert insights on business growth
✅ Daily tips to sharpen your skills
✅ Exclusive updates from The Coach SMB

Let's grow together!

Follow me on LinkedIn

No thanks, I’m not interested!

WhatsApp

WhatsApp

Skype

Skype

Hide