

The properties of the theme is mentioned in the view.xml of the theme. We can configure here Images, resize the product images and can confiure variables also. This file is placed in the <theme_dir>/etc/view.xml folder.
For example: The view.xml file of Blank Theme belongs to this folder: vendor/magento/theme-frontend-blank/etc/view.xml.
In this article, let’s find out more information about this file together.
-
- Configure image properties in the view.xml
- Resize catalog images
- Config variables in view.xml file
1. Config image properties in the view.xml file
Images are one of decisive factors to impress online customers and encourage them to purchase products. In Magento, image properties are stored in the view.xml file.
In this file, image properties are configured within the scope <images module=”Magento_Catalog”> element:
<media>
    <images module="Magento_Catalog">
    ...
    </images>
</media>
Image properties which are configured for each image are defined by id and type properties of image element:
<images module="Magento_Catalog">
   <image id="unique_image_id" type="image_type">
   ...
   </image>
</images>
Detailed image properties
- id is the only parameter and used in the .phtml template file to identify the image attributes at a specific position on a page: images of related products on product details page, product images on the product list / grid on categories.
For example, the Image ID used in the .phtml file is as follows:
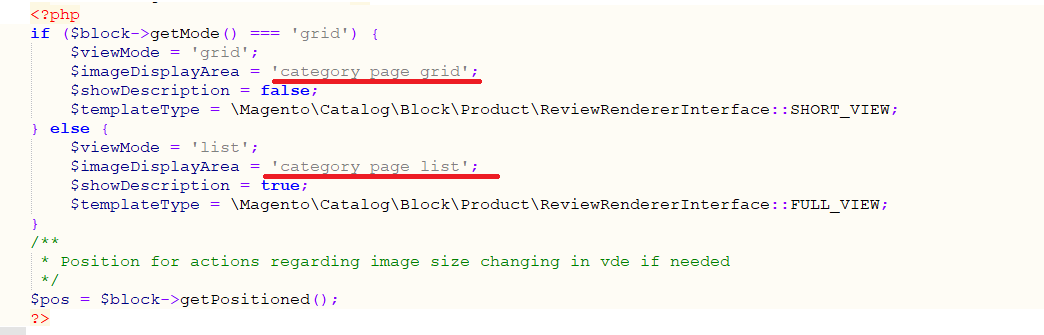
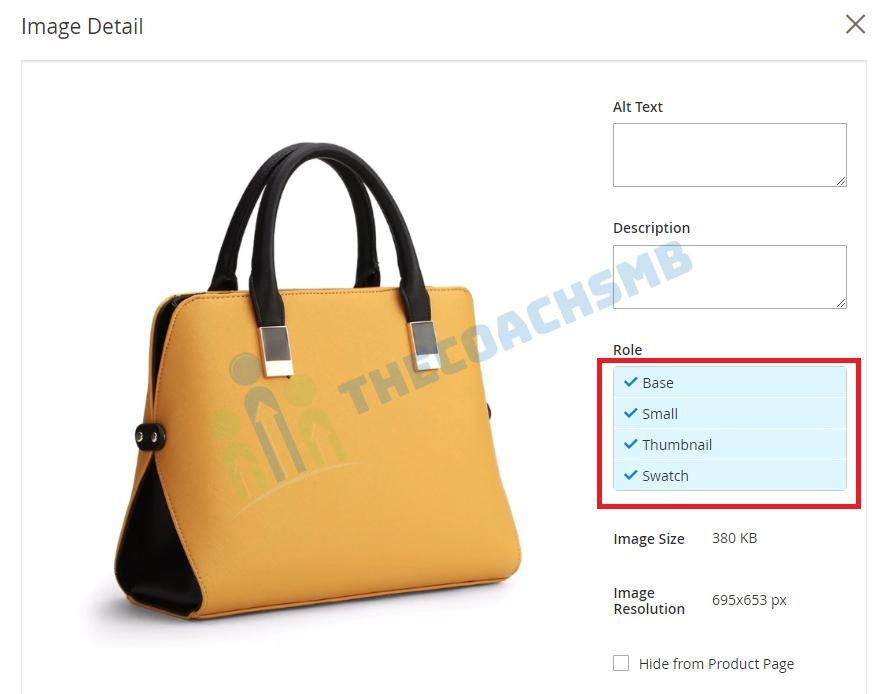
- The type defines which images are displayed, or which images are assigned in admin-> catalog-> product-> Images Videos section. Each image has a different role, and it allows loading various images such as small images and large images with the following values:
+ image – corresponds to the Base Image role
+ small_image – corresponds to the Small Image role
+ swatch_image – corresponds to the Swatch Image role
+ swatch_thumb – corresponds to the Swatch Image role
+ thumbnail – corresponds to the Thumbnail Image role
- In case you want to change or overwrite the value of view.xml file, you need to copy the entire view.xml file into your theme and change the value.
- To resize the product image in magento 2, open the file <theme_dir> /etc/view.xml, find the image with the correct ID and update the width and height parameters.
For example, resizing an image ID = product_small_image allows updating the product image size to 180×135.
<images module="Magento_Catalog">
    <image id="product_small_image" type="small_image">
        <width>180</width> <!-- Image width in px -->
        <height>135</height> <!-- Image height in px -->
    </image>
</images>
Full list of image parameters
Magento can resize images, keep aspect ratio, keep image aspect ratio transparent, and crop product images.
- width: specifies image width in pixels and is used to resize the product image.
+ Type: Integer
+ Default value: None.
- height: specifies image height in pixels, and is used to resize the product image.
+ Type: Integer
+ Default value: None
- constrain: If set to true, the image is smaller than the configuration requirements, and cannot be enlarged.
+ Type: Boolean
+ Default value: true
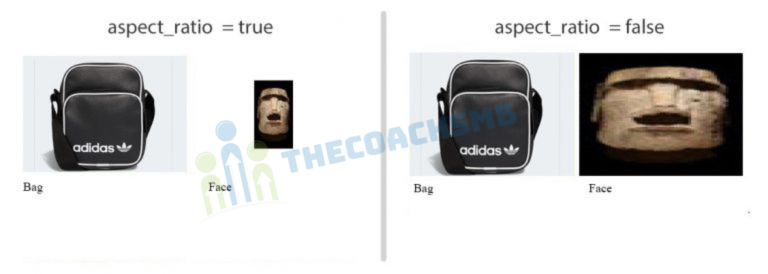
- aspect_ratio: If set to true, the ratio of image width and height are not changed without image fragmentation.
+ Type: Boolean.
+ Default value: true.
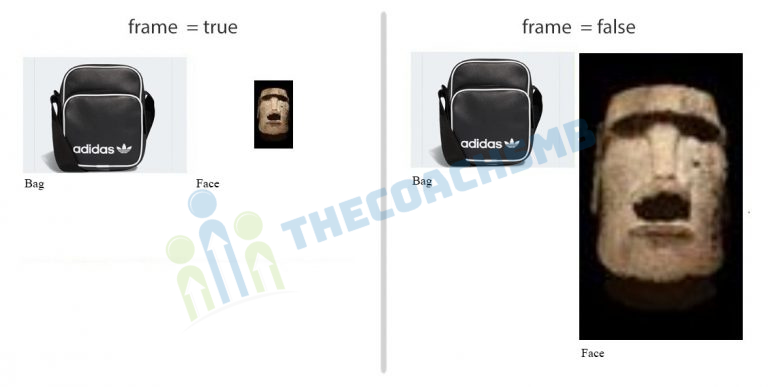
- frame: If set to true, the image is not cropped. The attribute is only applied in case the aspect_ratio is set to true.
+ Type: Boolean.
+ Default value: true.
- transparency: If set to true, the image with transparent background is saved. If set to false, the image will have a white background (by default).
+ Type: Boolean.
+ Default value: true.
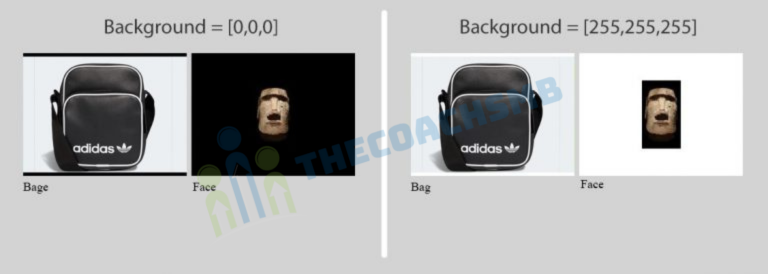
- background: This is the background color for the image, and does not apply to transparent images if transparency is set to true. It is used to remove the white image frame when you resize the image and adjust the background color to match with your theme.
+ Type: string.
+ Default Value: [255, 255, 255].
2. Resize catalog images
When you modify the view.xml file and want to update the image size that you have changed, you will use the ssh command:
php <magento install dir>/bin/magento catalog:images:resize
Generally, product images are cached while saving the product.
However, the magento catalog:images:resize command enables you to resize all images for display on your storefront.
Scenarios where resizing could be necessary might be:
- After you import products, which might have images of various sizes
- If images were resized or deleted manually from cache
Each image assigned to a product must be resized in accordance with image metadata defined in a module’s view.xml configuration file.
Where resized images get stored
After resizing an image, its resized copy is stored in the cache (/pub/media/catalog/product/cache directory). Magento serves storefront images from cache.
Command usage:
php bin/magento catalog:images:resize |
The message Product images resized successfully displays after the command has finished.
3. Config variables in view.xml file
The properties of the var variable are configured for individual modules, defined by the name of the module:
<vars module="Magento_Catalog">
    <var name="breakpoints">
        <var name="mobile">
            <var name="conditions">
                <var name="max-width">767px</var>
            </var>
            ...
        </var>
    </var>
    ...
</vars>
Any block that has been extended AbstractBlock can get variable values with the getVar method:
$block->getVar($name, $module = null)
Variables are not only used in view.xml but also in various sections such as Email templates, Blocks and content pages. We will continue to learn about predefined variables and customized variables in Magento 2.
Predefined Variables
Here is the list of variables in default Magento: In the view.xml file, default variables of the theme are set as follows:
<vars module="Magento_Catalog">
   <!-- Gallery and magnifier theme settings. Start -->
   <var name="gallery">
       <var name="nav">thumbs</var> <!-- Gallery navigation style (false/thumbs/dots) -->
       <var name="loop">true</var> <!-- Gallery navigation loop (true/false) -->
       <var name="keyboard">true</var> <!-- Turn on/off keyboard arrows navigation (true/false) -->
       <var name="arrows">true</var> <!-- Turn on/off arrows on the sides preview (true/false) -->
       <var name="caption">false</var> <!-- Display alt text as image title (true/false) -->
       <var name="allowfullscreen">true</var> <!-- Turn on/off fullscreen (true/false) -->
       <var name="navdir">horizontal</var> <!-- Sliding direction of thumbnails (horizontal/vertical) -->
       <var name="navarrows">true</var> <!-- Turn on/off on the thumbs navigation sides arrows(true/false) -->
       <var name="navtype">slides</var> <!-- Sliding type of thumbnails (slides/thumbs) -->
       <var name="transition">
           <var name="effect">slide</var> <!-- Sets transition effect for slides changing (slide/crossfade/dissolve) -->
           <var name="duration">500</var> <!-- Sets transition duration in ms -->
       </var>

       <var name="fullscreen">
           <var name="nav">thumbs</var> <!-- Fullscreen navigation style (false/thumbs/dots) -->
           <var name="loop">true</var> <!-- Fullscreen navigation loop (true/false/null) -->
           <var name="arrows">false</var> <!-- Turn on/off arrows on the sides preview in fullscreen (true/false/null) -->
           <var name="caption">false</var> <!-- Display alt text as image title in fullscreen(true/false) -->
           <var name="navdir">horizontal</var> <!--Sliding direction of thumbnails in fullscreen(horizontal/vertical)  -->
           <var name="navtype">slides</var> <!-- Sliding type of thumbnails (slides/thumbs) -->
           <var name="transition">
               <var name="effect">dissolve</var> <!-- Sets transition effect for slides changing (slide/crossfade/dissolve) -->
               <var name="duration">500</var> <!-- Sets transition duration in ms -->
           </var>
       </var>
   </var>

   <var name="magnifier">
       <var name="fullscreenzoom">20</var>  <!-- Zoom for fullscreen (integer)-->
       <var name="top"></var> <!-- Top position of magnifier -->
       <var name="left"></var> <!-- Left position of magnifier -->
       <var name="width"></var> <!-- Width of magnifier block -->
       <var name="height"></var> <!-- Height of magnifier block -->
       <var name="eventType">hover</var> <!-- Action that atcivates zoom (hover/click) -->
       <var name="enabled">false</var> <!-- Turn on/off magnifier (true/false) -->
   </var>

   <var name="breakpoints">
       <var name="mobile">
           <var name="conditions">
               <var name="max-width">767px</var>
           </var>

           <var name="options">
               <var name="options">
                   <var name="nav">dots</var>
               </var>
           </var>
       </var>
   </var>

   <!-- end. Gallery and magnifier theme settings -->
   <var name="product_small_image_sidebar_size">100</var>  <!-- Override for small product image -->
   <var name="product_base_image_size">275</var>           <!-- Override for base product image -->
   <var name="product_base_image_icon_size">48</var>       <!-- Base product image icon size -->
   <var name="product_list_image_size">166</var>           <!-- New Product image size used in product list -->
   <var name="product_zoom_image_size">370</var>           <!-- New Product image size used for zooming -->
   <var name="product_image_white_borders">0</var>
</vars>

<vars module="Magento_Bundle">
   <var name="product_summary_image_size">58</var>         <!-- New Product image size used for summary block-->
</vars>

<vars module="Js_Bundle">
   <var name="bundle_size">1MB</var>
</vars>
We also have email template variables:
- Email Footer Template: {{template config_path=”design/email/footer_template”}}
- Email Header Template: {{template config_path=”design/email/header_template”}}
- Email Logo Image Alt: {{var logo_alt}}
- Email Logo Image URL: {{var logo_url}}
- Email Logo Image Height: {{var logo_height}}
- Email Logo Image Width: {{var logo_width}}
- Template CSS: {{var template_styles|raw}}
Store Contact Information variables
- Base Unsecure URL: {{config path=”web/unsecure/base_url”}}
- Base Secure URL: {{config path=”web/secure/base_url”}}
- General Contact Name: {{config path=”trans_email/ident_general/name”}}
- General Contact Email: {{config path=”trans_email/ident_general/email”}}
- Sales Representative Contact Name: {{config path=”trans_email/ident_sales/name”}}
- Sales Representative Contact Email: {{config path=”trans_email/ident_sales/email”}}
- Custom1 Contact Name: {{config path=”trans_email/ident_custom1/name”}}
- Custom1 Contact Email: {{config path=”trans_email/ident_custom1/email”}}
- Custom2 Contact Name: {{config path=”trans_email/ident_custom2/name”}}
- Custom2 Contact Email: {{config path=”trans_email/ident_custom2/email”}}
- Store Name: {{config path=”general/store_information/name”}}
- Store Phone Telephone: {{config path=”general/store_information/phone”}}
- Store Hours: {{config path=”general/store_information/hours”}}
- Country: {{config path=”general/store_information/country_id”}}
- Region/State: {{config path=”general/store_information/region_id”}}
- Zip/Postal Code: {{config path=”general/store_information/postcode”}}
- City: {{config path=”general/store_information/city”}}
- Street Address 1: {{config path=”general/store_information/street_line1”}}
- Street Address 2: {{config path=”general/store_information/street_line2”}}
- Store Contact Address: {{config path=”general/store_information/address”}}
New Account Template variables:
- Customer Account URL: {{var this.getUrl($store, ‘customer/account/’)}}
- Customer Email: {{var customer.email}}
- Customer Name: {{var customer.name}}
New Order Template variables:
- Billing Address: {{var formattedBillingAddress|raw}}
- Email Order Note: {{var order.getEmailCustomerNote()}}
- Order ID: {{var order.increment_id}}
- Order Items Grid: {{layout handle=”sales_email_order_items” order=$order area=”frontend”}}
- Payment Details: {{var payment_html|raw}}
- Shipping Address: {{var formattedShippingAddress|raw}}
- Shipping Description: {{var order.getShippingDescription()}
Custom Variables
To customize variables when creating a custom theme, you can create a view.xml file to override the variables you want to change.
app\design\frontend\Themes\Yourtheme\etc\view.xml
For example: In the default theme, breakpoint on mobile screens has the max-with as 767. If you want to change on the mobile max-with screen to 600 in the newly created theme, you will change as follows:
<var name="breakpoints">
        <var name="mobile">
            <var name="conditions">
                <var name="max-width">600px</var>
            </var>
        </var>
    </var>
To create Custom Variable in admin, follow these steps:
Step 1: Navigate to Admin ⇒ System ⇒ Custom Variables.
Step 2: Click the Add New Variable button.
Step 3: In the Variable Code field, enter lowercase letters without spaces, for example: dev_name.
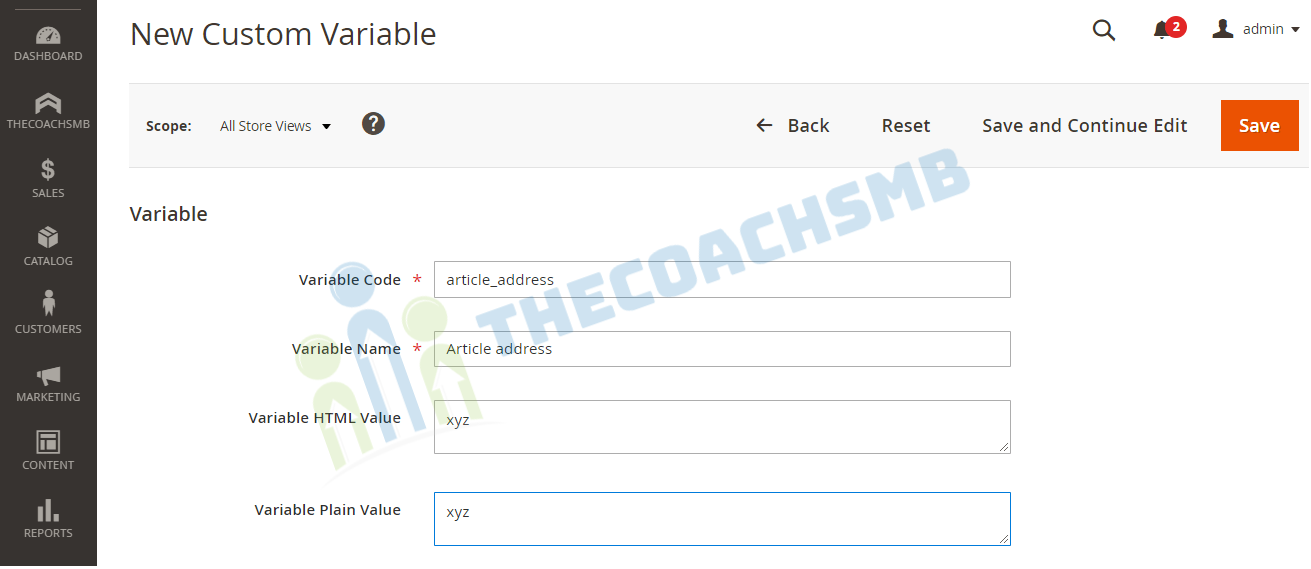
Enter Variable Name, Variable HTML Value, Variable Plain Value and click Save.Now we have a custom variable with the Artile Address. We cn use this variable pages.
code will be:
{{customVAr code=article_address}}
<exclude> property
The exclude tag is used to list browser resources that need to be excluded from the applied html page.
It is often used to remove files from the JavaScript bundling process. (JavaScript bundling is an optimization technique that you can use to reduce the number of server requests for JavaScript files. Bundling does this by merging multiple JavaScript files together into one file to reduce the number of page requests.)
Example: The following code will remove the files from the bundling process.
<exclude>
    <item type="file">Lib::jquery/jquery.min.js</item>

    <item type="file">Lib::jquery/jquery-ui-1.9.2.js</item>

    <item type="file">Lib::jquery/jquery.ba-hashchange.min.js</item>

    <item type="file">Lib::jquery/jquery.details.js</item>

    <item type="file">Lib::jquery/jquery.details.min.js</item>

    <item type="file">Lib::jquery/jquery.hoverIntent.js</item>

    <item type="file">Lib::jquery/colorpicker/js/colorpicker.js</item>

    <item type="file">Lib::requirejs/require.js</item>

    <item type="file">Lib::requirejs/text.js</item>

    <item type="file">Lib::date-format-normalizer.js</item>

    <item type="file">Lib::legacy-build.min.js</item>

    <item type="file">Lib::mage/captcha.js</item>

    <item type="file">Lib::mage/dropdown_old.js</item>

    <item type="file">Lib::mage/list.js</item>

    <item type="file">Lib::mage/loader_old.js</item>

    <item type="file">Lib::mage/webapi.js</item>

    <item type="file">Lib::mage/zoom.js</item>

    <item type="file">Lib::mage/translate-inline-vde.js</item>

    <item type="file">Lib::mage/requirejs/mixins.js</item>

    <item type="file">Lib::mage/requirejs/static.js</item>

    <item type="file">Magento_Customer::js/zxcvbn.js</item>

    <item type="file">Magento_Catalog::js/zoom.js</item>

    <item type="file">Magento_Ui::js/lib/step-wizard.js</item>

    <item type="file">Magento_Ui::js/form/element/ui-select.js</item>

    <item type="file">Magento_Ui::js/form/element/file-uploader.js</item>

    <item type="file">Magento_Ui::js/form/components/insert.js</item>

    <item type="file">Magento_Ui::js/form/components/insert-listing.js</item>

    <item type="directory">Magento_Ui::js/timeline</item>

    <item type="directory">Magento_Ui::js/grid</item>

    <item type="directory">Magento_Ui::js/dynamic-rows</item>

    <item type="directory">Magento_Ui::templates/timeline</item>

    <item type="directory">Magento_Ui::templates/grid</item>

    <item type="directory">Magento_Ui::templates/dynamic-rows</item>

    <item type="directory">Magento_Swagger::swagger-ui</item>

    <item type="directory">Lib::modernizr</item>

    <item type="directory">Lib::tiny_mce</item>

    <item type="directory">Lib::varien</item>

    <item type="directory">Lib::jquery/editableMultiselect</item>

    <item type="directory">Lib::jquery/jstree</item>

    <item type="directory">Lib::jquery/fileUploader</item>

    <item type="directory">Lib::css</item>

    <item type="directory">Lib::lib</item>

    <item type="directory">Lib::extjs</item>

    <item type="directory">Lib::prototype</item>

    <item type="directory">Lib::scriptaculous</item>

    <item type="directory">Lib::less</item>

    <item type="directory">Lib::mage/adminhtml</item>

    <item type="directory">Lib::mage/backend</item>

</exclude>
3. Conclusion
In this article, we have seen the configuring imges, resizing it, creating preferred and customized variables and its uses.
Hope this article was clear, do comment below your feedback.
 Let’s Connect on LinkedIn!
  Expert insights on business growth