

Table of Contents
Introduction
Elasticsearch is a platform for the distributed search and analysis of data in real time. Elasticsearch is written in the Java programming language. Its popularity is due to its ease of use, powerful features, and scalability.
Elasticsearch supports RESTful operations. This means that you can use HTTP methods (GET, POST, PUT, DELETE, etc.) in combination with an HTTP URI (/collection/entry) to manipulate your data. The intuitive RESTful approach is both developer and user friendly, which is one of the reasons for Elasticsearch’s popularity.
Elasticsearch is free and open-source software with a solid company behind it — Elastic.
There are following steps for this:
- Step 1 – Installing Java on CentOS
- Step 2 — Downloading and Installing Elasticsearch on CentOS
- Step 3 — Configuring Elasticsearch on CentOS
- Step 4 — Testing Elasticsearch on CentOS
Let’s start with the process…
Step 1 — Installing Java on CentOS
Elasticsearch is written in the Java programming language. So our first step is to install a Java Runtime Environment (JRE) on your server. You will use the native CentOS OpenJDK package for the JRE.
- Make a directory where you want to install Java. For global access (for all users) install it preferably in the directory
/opt/java.
# mkdir /opt/java && cd /opt/java
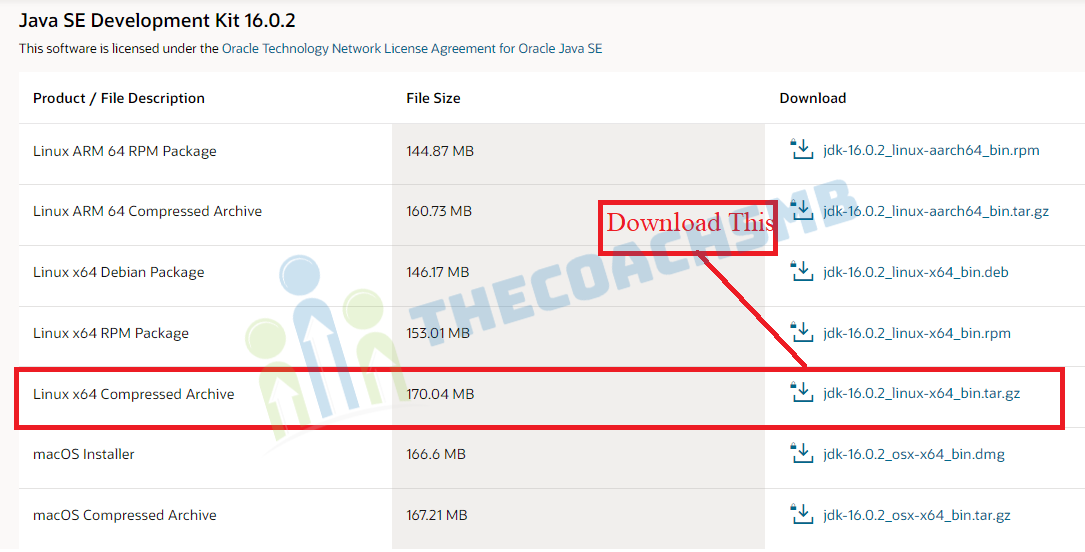
- Now it’s time to download Java (JDK) 9 source tarball files for your system architecture by going to official Java download page.
For reference, we have provided the source tarball file-name, please select and download these below mentioned file only.
jdk-16.0.2_linux-x64_bin.tar.gz
Alternatively, you may use wget command to download file directly into the /opt/java directory as shown below.
# cd /opt/java
# wget --no-cookies --no-check-certificate --header "Cookie: oraclelicense=accept-securebackup-cookie" http://download.oracle.com/otn-pub/java/jdk/16.0.2+11/c2514751926b4512b076cc82f959763f/jdk-16.0.2_linux-x64_bin.tar.gz
- Once file has been downloaded, you may extract the tarball using tar command as shown below.
# tar -zxvf jdk-16.0.2_linux-x64_bin.tar.gz
- Next, move to the extracted directory and use command
update-alternativesto tell system where java and its executables are installed.
# cd jdk-16.0.2/
# update-alternatives --install /usr/bin/java java /opt/java/jdk-16.0.2/bin/java 100
# update-alternatives --config java
- Tell system to update javac alternatives as:
# update-alternatives --install /usr/bin/javac javac /opt/java/jdk-16.0.2/bin/javac 100
# update-alternatives --config javac
- Similarly, update jar alternatives as:
# update-alternatives --install /usr/bin/jar jar /opt/java/jdk-16.0.2/bin/jar 100
# update-alternatives --config jar
- Setting up Java Environment Variables.
# export JAVA_HOME=/opt/java/jdk-16.0.2/
# export JRE_HOME=/opt/java/jdk-16.0.2/jre
# export PATH=$PATH:/opt/java/jdk-16.0.2/bin:/opt/java/jdk-16.0.2/jre/bin
- Now You may verify the Java version again, to confirm.
# java -version

Suggested: If you are not using OpenJDK (open source implementation of java), you may remove it as:
# yum remove openjdk-*      [On CentOs/RHEL]
# apt-get remove openjdk-*  [On Debian/Ubuntu]
Step 2 — Downloading and Installing Elasticsearch on CentOS
You can download Elasticsearch directly from elastic.co in zip, tar.gz, deb, or rpm packages. For CentOS, it’s best to use the native rpm package, which will install everything you need to run Elasticsearch.
At the time of this writing, the latest Elasticsearch version is 7.14.0.
From a working directory, download the program:
sudo rpm -ivh https://artifacts.elastic.co/downloads/elasticsearch/elasticsearch-7.14.0-x86_64.rpmElasticsearch will install in /usr/share/elasticsearch/, with its configuration files placed in /etc/elasticsearch and its init script added in /etc/init.d/elasticsearch.
To make sure Elasticsearch starts and stops automatically with the server, add its init script to the default runlevels:
sudo systemctl daemon-reload && sudo systemctl enable elasticsearch.serviceWith Elasticsearch installed, you will now configure a few important settings.
Step 3 — Configuring Elasticsearch on CentOS
Now that you have installed Elasticsearch and its Java dependency, it is time to configure Elasticsearch.
The Elasticsearch configuration files are in the /etc/elasticsearch directory. The ones we’ll review and edit are:
elasticsearch.yml— Configures the Elasticsearch server settings. This is where most options are stored, which is why we are mostly interested in this file.jvm.options— Provides configuration for the JVM such as memory settings.
The first variables to customize on any Elasticsearch server are node.name and cluster.name in elasticsearch.yml. Let’s do that now.
As their names suggest, node.name specifies the name of the server (node) and the cluster to which the latter is associated. If you don’t customize these variables, a node.name will be assigned automatically in respect to the server hostname. The cluster.name will be automatically set to the name of the default cluster.
The cluster.name value is used by the auto-discovery feature of Elasticsearch to automatically discover and associate Elasticsearch nodes to a cluster. Thus, if you don’t change the default value, you might have unwanted nodes, found on the same network, in your cluster.
Let’s start editing the main elasticsearch.yml configuration file.
Open it using nano or your preferred text editor:
sudo nano /etc/elasticsearch/elasticsearch.ymlRemove the # character at the beginning of the lines for node.name and cluster.name to uncomment them, and then change their values. Your first configuration changes in the /etc/elasticsearch/elasticsearch.yml file will look like this:
Open jvm.options:
sudo nano /etc/elasticsearch/jvm.optionsNow change the Xms and Xmx values to 512MB:
Now start Elasticsearch for the first time:
sudo systemctl start elasticsearch.serviceAllow some time for Elasticsearch to start before you attempt to use it. Otherwise, you may get a connection error.
Step 4 — Testing Elasticsearch on CentOS
By now, Elasticsearch should be running on port 9200. You can test this using curl, the command-line tool for client-side URL transfers.
To test the service, make a GET request like this:
curl -X GET 'http://localhost:9200'You will see the following response:
Output:
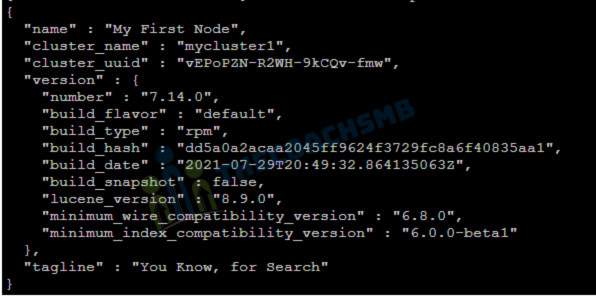
Congratulations !! If you see a similar response, Elasticsearch is working properly. If not, recheck the installation instructions and allow some time for Elasticsearch to fully start.
Happy Learning !!
Thank you !!