

In this blog, we will understand how to create admin menu for the Magento2.
I have explained how to create frontend module in the previous series. You can have a look at it with the following 4 parts:
Frontend Custom Module:-
- PART 1 – How to Build a Complete Module
- PART 2 – Create Custom Module URL and Display Content
- PART 3 – Create Custom Module URL and Display Content
- PART 4 – Display Data From Database On Frontend in Magento2
Let’s start the admin panel custom module. I have divided the steps into following so that we can understand easily.
- Step 1: Create Magento 2 Module Structure
- Step 2: Declaration of Module
- Step 3: Registration of Module
- Step 4: Create Main Menu in Admin Panel
- Step 5: Create Sub Menu in Admin Panel
Step 1: Create Magento 2 Module Structure
There are two locations where a module can be located in a Magento 2 application.
The first location is an app/code directory. This directory is used to add all custom and 3rd-party Magento 2 modules. This location is usually used by development agencies, internal or in-house developers in order to simplify a development process.
The second location is a vendor directory. All the Magento 2 core modules are located under vendor/magento. Example –

Complete custom module in Magento2
The above is a standard module folder structure. This is the folder structure of the Magento catalog module.
1. Create the following folders in the magento project root directory (ex. – C:\xampp\htdocs\magento2):
- app/code/Thecoachsmb
- app/code/Thecoachsmb/Mymodule
The Thecoachsmb folder is the module’s VendorName, and Mymodule is the ModuleName.
Note: If you don’t have the code folder in your app directory, create it manually.
Now, create app/code/Thecoachsmb/Mymodule/composer.json:
Contents would be:
{}
This file will be loaded by Composer every-time you run it even though we are not actually using Composer with our module.
Step 2: Declaration of Module
It is necessary to create etc folder and add the module.xml file in it
app/code/Thecoachsmb/Mymodule/etc/module.xml
Contents would be:
<?xml version="1.0"?>
<config xmlns:xsi="http://www.w3.org/2001/XMLSchema-instance" xsi:noNamespaceSchemaLocation="urn:magento:framework:Module/etc/module.xsd">
<module name="Thecoachsmb_Mymodule" setup_version="1.0.0">
 </module>
</config>
Step 3: Registration of Module
To register the module, create a registration.php file in the app/code/Thecoachsmb/Mymodule/registration.php
Contents would be:
<?php
\Magento\Framework\Component\ComponentRegistrar::register(
	\Magento\Framework\Component\ComponentRegistrar::MODULE,
	'Thecoachsmb_Mymodule',
	__DIR__
);
Step 4: Create Main Menu in Admin Panel
Menus are configured by the file menu.xml which is located in module’s etc/adminhtml folder. It consists of config and menu nodes and add directives. Menu node may consist of multiple add directives.
This file displays menus in the admin panel. Let’s Add Menu “TheCoachSMB” in Admin panel.
Path: app/code/Thecoachsmb/Mymodule/etc/adminhtml/menu.xml
– Below is a sample of main menu, set name as: “TheCoachSMB”.
<?xml version="1.0"?>
<config xmlns:xsi="http://www.w3.org/2001/XMLSchema-instance" xsi:noNamespaceSchemaLocation="urn:magento:module:Magento_Backend:etc/menu.xsd">
    <menu>
        <add id="Thecoachsmb_Mymodule::menu" title="TheCoachSMB" translate="title" module="Thecoachsmb_Mymodule" sortOrder="10" resource="Thecoachsmb_Mymodule::menu"/>
    </menu>
</config>
Attributes:
-
- Id: Specify identifier of the menu. It should be unique and comply with the format: [Namespace_ModuleName]::[menu_name].
- Title:text that is shown in menu
- Module: Name of the module, formatted as: [Namespace_ModuleName].
- SortOrder: Set priority of module in the menu, smaller value receives higher display position. Module receives value “0” can be added with an icon.
- Resource: defines the ACL rule which the admin user must have in order to see and access this menu, it is defined in acl.xml. Otherwise, menu item won’t be rendered. For simplicity, Magento_Backend::content is used.
You can see them above the level-0 menu title. This icon is generated by ‘Admin Icons’ font in Magento. You can see all of the icon and how to create an icon in this link
Now run the below commands in root file of Magento:
php bin/magento module:enable Thecoachsmb_Mymodule && php bin/magento setup:upgrade && php bin/magento setup:static-content:deploy -f && php bin/magento cache:flush
It turns out a main menu TheCoachSMB Menu at the left navigation – Admin Menu
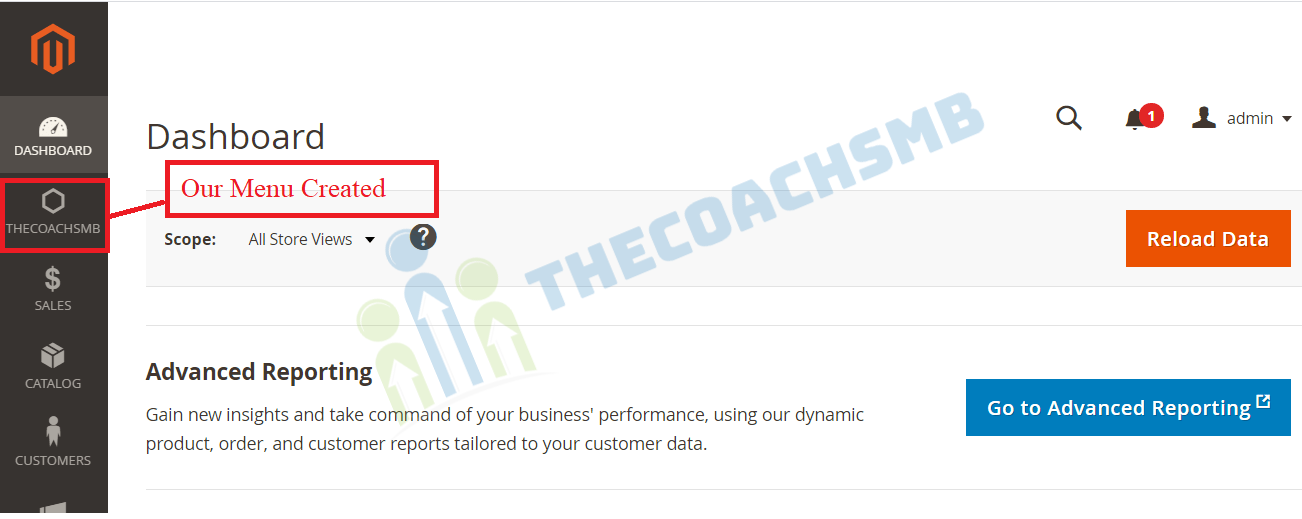
Successful created new admin menu
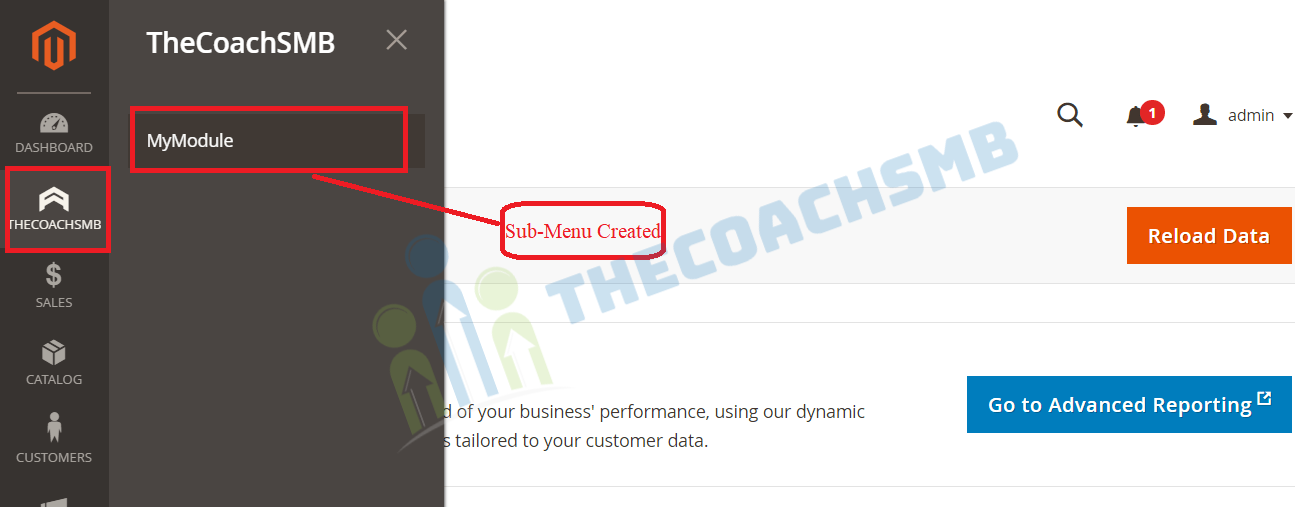
Step 5: Create Sub Menu in Admin Panel
– Create a new sub-menu in the main menu in the app/code/Thecoachsmb/Mymodule/etc/adminhtml/menu.xml. Set MyModule as its name.
<?xml version="1.0"?>
<config xmlns:xsi="http://www.w3.org/2001/XMLSchema-instance" xsi:noNamespaceSchemaLocation="urn:magento:module:Magento_Backend:etc/menu.xsd">
   <menu>
       <add id="Thecoachsmb_Mymodule::menu"
           title="TheCoachSMB" translate="title" module="Thecoachsmb_Mymodule"
           sortOrder="10"
           resource="Thecoachsmb_Mymodule::menu"
           />
       <!-- START: new node -->
       <add id="Thecoachsmb_Mymodule::submenu_mymodule"
           title="MyModule" translate="title" module="Thecoachsmb_Mymodule"
           sortOrder="20" parent="Thecoachsmb_Mymodule::menu"
           action="mymodule/create/index"
           resource="Thecoachsmb_Mymodule::submenu_mymodule"
           />
       <!-- END:   new node -->
   </menu>
</config>
Attributes in sub-menu:
- Parent: Value is the ID of the main menu. It specifies the sub menu belongs to parentory menu.
- Action: Direct URL if clicking to the menu, as format [router_name]/[controller_name]/[action_name]. – In our example, menu links with module mymodule, controller Create and action Index.
Run Magento CLI command cache:clean, you have successfully created menu content MyModule inside TheCoachSMB Menu.
Hope you also got your menu. You can add as many menu as you want.
Create File Routes.Xml
Path: app/code/Thecoachsmb/Mymodule/etc/adminhtml/routes.xml
<?xml version="1.0"?>
<config xmlns:xsi="http://www.w3.org/2001/XMLSchema-instance" xsi:noNamespaceSchemaLocation="urn:magento:framework:App/etc/routes.xsd">
<router id="admin">
    <route id="mymodule" frontName="mymodule">
        <module name="Thecoachsmb_Mymodule"/>
    </route>
</router>
</config>
Step 5: Create Page To Attach Link In The Menu. Create File Index.Php
Path: app/code/Thecoachsmb/Mymodule/Controller/Adminhtml/Create/Index.php
<?php
namespace Thecoachsmb\Mymodule\Controller\Adminhtml\Create;
class Index extends \Magento\Backend\App\Action {
protected $resultPageFactory = false;
	public function __construct(
		\Magento\Backend\App\Action\Context $context,
		\Magento\Framework\View\Result\PageFactory $resultPageFactory
	)
	{
		parent::__construct($context);
		$this->resultPageFactory = $resultPageFactory;
	}
	public function execute()
	{
		$resultPage = $this->resultPageFactory->create();
		$resultPage->getConfig()->getTitle()->prepend((__('Posts')));

		return $resultPage;
	}
}
Step 6: Determine The Interface Of The Page
Define layout and page structure. Create file mymodule_create_index.xml
Path: app/code/Thecoachsmb/Mymodule/view/adminhtml/layout/mymodule_create_index.xml
<?xml version="1.0"?>
<page xmlns:xsi="http://www.w3.org/2001/XMLSchema-instance" xsi:noNamespaceSchemaLocation="urn:magento:framework:View/Layout/etc/page_configuration.xsd">
   <body>
       <referenceContainer name="content">
               <block class="Magento\Backend\Block\Template" template="Thecoachsmb_Mymodule::view.phtml"/>
       </referenceContainer>
   </body>
</page>
Set up page content. Create file helloworld.phtm
Path: app/code/Thecoachsmb/Mymodule/view/adminhtml/templates/view.phtml
<p>Welcome ...</p>
Step 7: Install Module
Run command in root file of Magento:
php bin/magento setup:upgrade php bin/magento setup:static-content:deploy -f php bin/magento cache:flush
Create admin grid:-
Follow the steps:
Step 8: Create Admin Grid using Component
Step 8.1: Declare resource
Declare resource in dependency injection file Now we will create di.xml file which will connect to the Model to get the data for our grid.
File: app/code/Thecoachsmb/Mymodule/etc/di.xml
With the following content:
<?xml version="1.0"?>
<config xmlns:xsi="http://www.w3.org/2001/XMLSchema-instance" xsi:noNamespaceSchemaLocation="../../../../../lib/internal/Magento/Framework/ObjectManager/etc/config.xsd">
    <type name="Magento\Framework\View\Element\UiComponent\DataProvider\CollectionFactory">
        <arguments>
            <argument name="collections" xsi:type="array">
                <item name="thecoachsmb_mymodule_create_listing_data_source" xsi:type="string">Thecoachsmb\Mymodule\Model\ResourceModel\View\Collection</item>
            </argument>
        </arguments>
    </type>
    <virtualType name="Thecoachsmb\Mymodule\Model\ResourceModel\View\Collection" type="Magento\Framework\View\Element\UiComponent\DataProvider\SearchResult">
        <arguments>
            <argument name="mainTable" xsi:type="string">thecoachsmb_article</argument>
            <argument name="resourceModel" xsi:type="string">Thecoachsmb\Mymodule\Model\ResourceModel\View</argument>
        </arguments>
    </virtualType>
</config>
This file will declare the post collection class, table and resourceModel for the table. This source will be called in the layout file to get data for grid. you will get the Model File here.
Step 8.2: Create layout file
For the action mymodule/create/index, we will create a layout file name mymodule_create_index.xml
File: app/code/Thecoachsmb/Mymodule/view/adminhtml/layout/mymodule_create_index.xml
With the following content:
<page xmlns:xsi="http://www.w3.org/2001/XMLSchema-instance" xsi:noNamespaceSchemaLocation="../../../../../../../lib/internal/Magento/Framework/View/Layout/etc/page_configuration.xsd">
    <update handle="styles"/>
    <body>
        <referenceContainer name="content">
            <uiComponent name="thecoachsmb_mymodule_create_listing"/>
        </referenceContainer>
    </body>
</page>
In this layout file, we declare an uiComponent for the content of this page.
Step8.3: Create component layout file
As declaration in layout file, we will create a component file thecoachsmb_mymodule_create_listing.xml
File: app/code/Thecoachsmb/Mymodule/view/adminhtml/ui_component/thecoachsmb_mymodule_create_listing.xml
With the following content:
<listing xmlns:xsi="http://www.w3.org/2001/XMLSchema-instance" xsi:noNamespaceSchemaLocation="urn:magento:module:Magento_Ui:etc/ui_configuration.xsd">
    <argument name="data" xsi:type="array">
        <item name="js_config" xsi:type="array">
            <item name="provider" xsi:type="string">thecoachsmb_mymodule_create_listing.thecoachsmb_mymodule_create_listing_data_source</item>
            <item name="deps" xsi:type="string">thecoachsmb_mymodule_create_listing.thecoachsmb_mymodule_create_listing_data_source</item>
        </item>
        <item name="spinner" xsi:type="string">spinner_columns</item>
        <item name="buttons" xsi:type="array">
            <item name="add" xsi:type="array">
                <item name="name" xsi:type="string">add</item>
                <item name="label" xsi:type="string" translate="true">Add New Post</item>
                <item name="class" xsi:type="string">primary</item>
                <item name="url" xsi:type="string">*/*/new</item>
            </item>
        </item>
    </argument>
    <dataSource name="nameOfDataSource">
        <argument name="dataProvider" xsi:type="configurableObject">
            <argument name="class" xsi:type="string">Magento\Framework\View\Element\UiComponent\DataProvider\DataProvider</argument>
            <argument name="name" xsi:type="string">thecoachsmb_mymodule_create_listing_data_source</argument>
            <argument name="primaryFieldName" xsi:type="string">article_id</argument>
            <argument name="requestFieldName" xsi:type="string">id</argument>
            <argument name="data" xsi:type="array">
                <item name="config" xsi:type="array">
                    <item name="component" xsi:type="string">Magento_Ui/js/grid/provider</item>
                    <item name="update_url" xsi:type="url" path="mui/index/render"/>
                    <item name="storageConfig" xsi:type="array">
                        <item name="indexField" xsi:type="string">article_id</item>
                    </item>
                </item>
            </argument>
        </argument>
    </dataSource>
    <columns name="spinner_columns">
        <selectionsColumn name="ids">
            <argument name="data" xsi:type="array">
                <item name="config" xsi:type="array">
                    <item name="resizeEnabled" xsi:type="boolean">false</item>
                    <item name="resizeDefaultWidth" xsi:type="string">55</item>
                    <item name="indexField" xsi:type="string">article_id</item>
                </item>
            </argument>
        </selectionsColumn>
        <column name="article_id">
            <argument name="data" xsi:type="array">
                <item name="config" xsi:type="array">
                    <item name="filter" xsi:type="string">textRange</item>
                    <item name="sorting" xsi:type="string">asc</item>
                    <item name="label" xsi:type="string" translate="true">ID</item>
                </item>
            </argument>
        </column>
        <column name="title">
            <argument name="data" xsi:type="array">
                <item name="config" xsi:type="array">
                    <item name="filter" xsi:type="string">text</item>
                    <item name="editor" xsi:type="array">
                        <item name="editorType" xsi:type="string">text</item>
                        <item name="validation" xsi:type="array">
                            <item name="required-entry" xsi:type="boolean">true</item>
                        </item>
                    </item>
                    <item name="label" xsi:type="string" translate="true">Title</item>
                </item>
            </argument>
        </column>
        <column name="content">
            <argument name="data" xsi:type="array">
                <item name="config" xsi:type="array">
                    <item name="filter" xsi:type="string">text</item>
                    <item name="editor" xsi:type="array">
                        <item name="editorType" xsi:type="string">text</item>
                        <item name="validation" xsi:type="array">
                            <item name="required-entry" xsi:type="boolean">true</item>
                        </item>
                    </item>
                    <item name="label" xsi:type="string" translate="true">Content</item>
                </item>
            </argument>
        </column>
        <column name="created_at" class="Magento\Ui\Component\Listing\Columns\Date">
            <argument name="data" xsi:type="array">
                <item name="config" xsi:type="array">
                    <item name="filter" xsi:type="string">dateRange</item>
                    <item name="component" xsi:type="string">Magento_Ui/js/grid/columns/date</item>
                    <item name="dataType" xsi:type="string">date</item>
                    <item name="label" xsi:type="string" translate="true">Created</item>
                </item>
            </argument>
        </column>
    </columns>
</listing>
With this code, you will know how to declare Grid layout (button, columns), call data source. Please refresh the cache, and access to this grid page, the admin grid will show up like this:
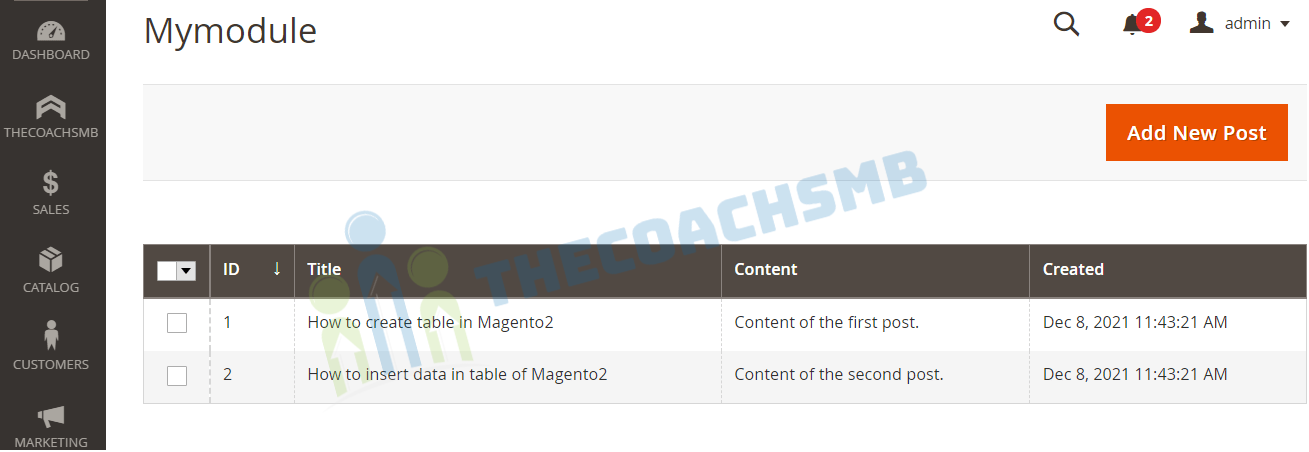
Simple.
Keep posting your feedback and queries. Happy Learning !! Thank You !!
i guess you forgot to share model file here …. which is generating error.
hope you will update it as soon as possible.
Thank you !
You will get the Model file here – https://www.thecoachsmb.com/display-data-from-database-on-frontend-in-magento2/